How to use Family Safety to monitor your children's activity on Windows 8
Lawrence Abrams
- October 17, 2012
- Read 61,692 times
Table of Contents
- Introduction to Family Safety
- Create a new child's account and enable Family Safety
- Configuring an existing account to use Family Safety
- How to configure Family Safety in Windows 8
- Changing the Rating System that will be used with Family Safety
- How to view activity reports.
- Frequently Asked Question
Introduction to Family Safety
Protecting your children while they are online can be a difficult and scary task for any parent. While it is important to introduce children to computers and the Internet, it is also just as important to do this in a safe environment. To help you with this is Family Safety, which is a parental control applications that monitors your children's online activity, and if necessary, controls what they can do on the computer. By using a tool like Family Safety a parent can feel comfortable allowing their child to use the computer and the Internet while knowing exactly what they are doing and where they are going.
Using Family Safety a parent can restrict what web sites a child visits, what applications they can use, and when they are allowed to use the computer. Family Safety will also send out daily and weekly reports to the parents that contain detailed information about a particular child's activity on the computer. You can also view these reports and change restrictions on a particular child's account via the http://familysafety.microsoft.com/ web site.
This tutorial will provide in-depth guidance on how to properly setup Family Safety on a Windows 8 computer to create a safe environment for your children. We will discuss how to create a new account with parental controls enabled, activate Family Safety on an existing account, and provide detailed explanations on each of the available configuration options.
Create a new child's account and enable Family Safety
The first step in enabling Family Safety is to create a new account for your child and enable parental controls. To create an account, type in Add User when you are at the Windows Start Screen. When the search results appear click on the Settings category as shown below.
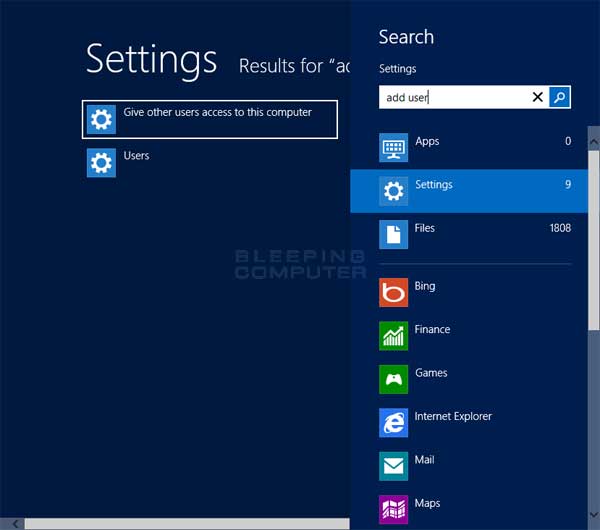
Figure 1. Add User search
Now click on the option labeled Give other users access to this computer, which will open the User Settings screen.
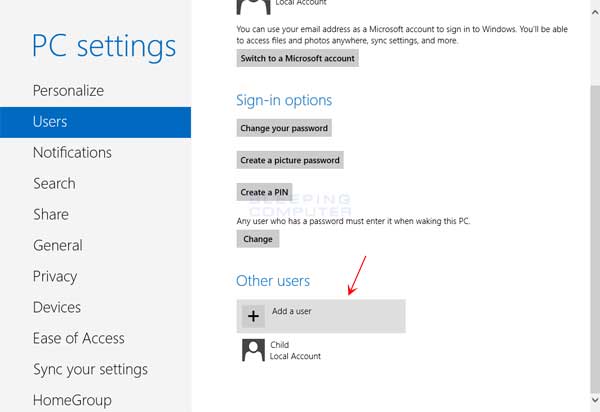
Figure 2. User's Setting screen
Scroll down and click on the Add User option as shown above. You will now be at a screen prompting you to enter the user's email address. When creating an account in Windows 8 you can either set it up as a local account or use a Windows Live account to integrate online services such as SkyDrive into Windows 8. If you wish to use a Microsoft account, please enter the child's email address or create a Windows Live account for them. On the other hand, if you wish to just create a local account, click on the Sign in without a Microsoft account option. You will then be brought to a new screen prompting you again whether you want to use a Microsoft or Local account. At this screen you should select Local Account.
You will now be at a screen prompting you for the user's account name, password, and a password hint that can be used to recover the password in the future. Please fill in this information and click on the Next button.
You will now be at a confirmation screen that lets you review the account that will be created as shown below.
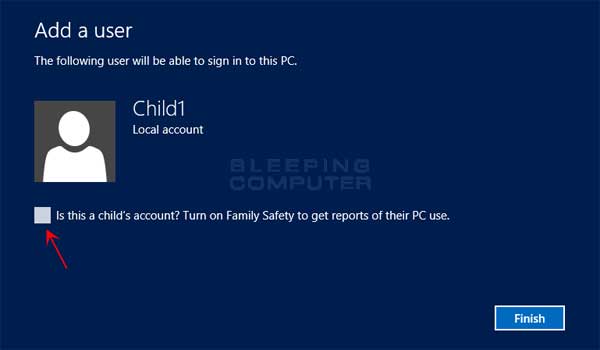
Figure 3. Adding a new user confirmation
To enable Family Safety monitoring on this child's account, put a check mark in the checkbox labeled Is this a child's account? and then click on the Finish button.
The account is now created and Family Safety is now configured for that account. For information on how to configure Family Safety settings for this new account, please skip to this section.
Configuring an existing account to use Family Safety
If you wish to enable Family Safety on an existing account, please type in Family Safety when you are at the Windows Start Screen and then click on the Settings category as shown below.
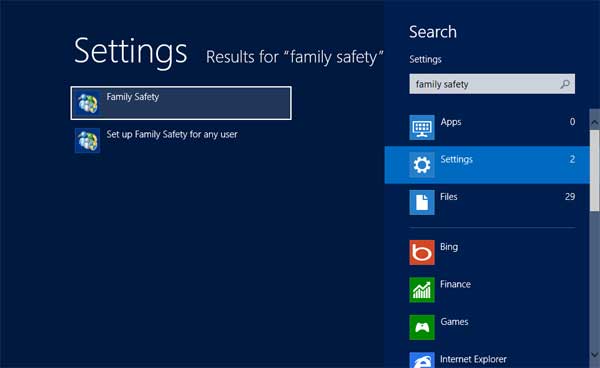
Figure 4. Searching for the Family Safety Setting
Now click on the option labeled Family Safety, which will open the Family Safety screen.
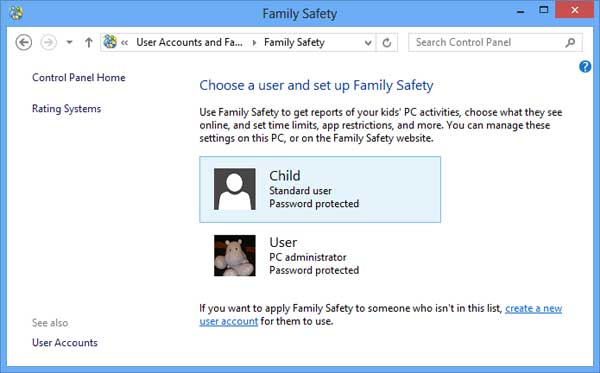
Figure 5. Family Safety screen
To enable Family Safety on an account, click on it once with your mouse. This will open up the Family Safety User Settings screen.
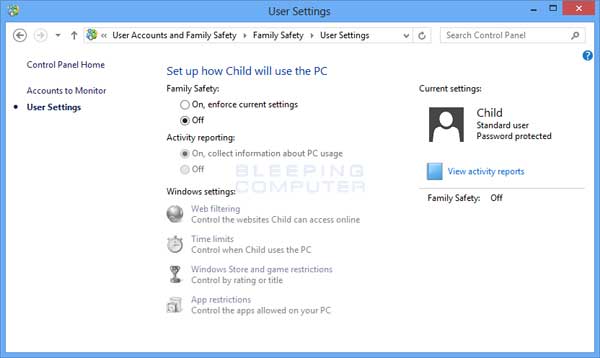
Figure 6. Family Safety Settings for a particular user
To monitor this child's activity, select the On, enforce current settings button. Family safety is now enabled on this user's account and your will receive weekly reports on their activity. You can now close the User Settings window.
For information on how to configure Family Safety settings for this account, please see the next section.
How to configure Family Safety in Windows 8
Microsoft's Family Safety approach is to monitor first and then restrict as necessary. Using this approach, when a child is enrolled in Family Safety there will be no restrictions placed on the account by default. Instead they will be able to use the full capabilities of the computer without limitation and you will receive daily and weekly reports about the child's activity. As you review their behavior and you find that you need to restrict them in some way, you can then modify the Family Safety settings to limit their usage on the Internet or on the computer.
To configure restrictions on a child account, you need to do so from the Family Safety control panel. To get there you should type Family Safety when you are at the Windows Start Screen and then click on the Settings. When you click on the Settings category, you should see an option on the left called Family Safety. Please click on that setting and you will now be at the Family Safety control panel.
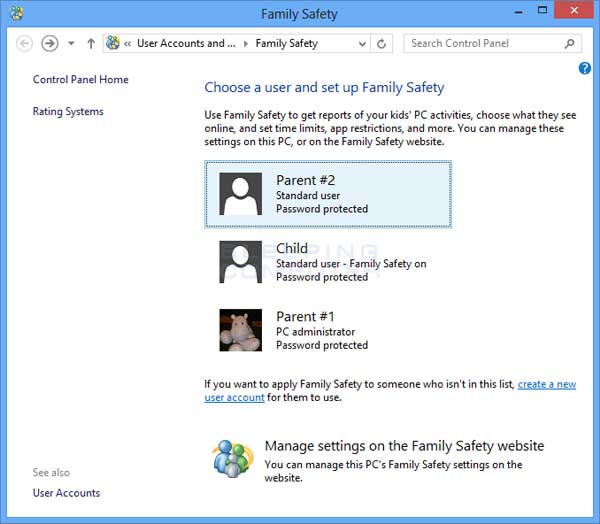
Figure 7. Family Safety screen
To change a particular child's settings, click on the child's name. This will open up the User Settings screen as shown below.
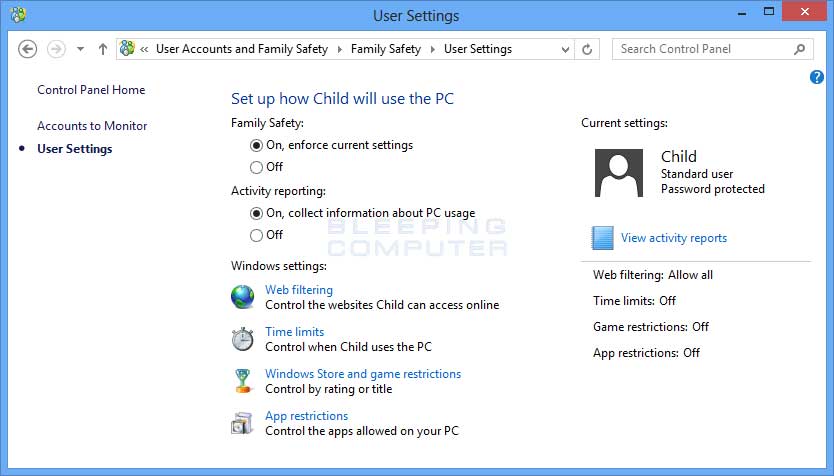
Figure 8. User Settings
On this screen you will see a variety of options that you can configure. By default, Activity report is enabled so that you receive daily and weekly reports on your children's activities. You should not disable this feature.
Under the Windows settings category you see four categories that you can configure to limit your child's activity on the computer and the Internet. These categories are:
Web Filtering
The web filtering category allows you to restrict what web sites the child can visit. For more detailed information about this setting, please read the Web Filtering section below.
Time Limits
This section allows you to configure how much time a child can use the computer in a given day or when they are allowed to use it. For more detailed information on how to configure this setting, please read the Time Limits section below.
Windows Store and game restrictions
This category allows you to restrict what types of games and Windows Store apps the child is allowed to play. For more detailed information on the Windows Store and game restrictions, please see this section.
App restrictions
This section allows you to place restrictions on what applications a child can use. For more detailed information on how to configure this restriction, please see the App restrictions section.
If you wish to make changes to a user's settings please left-click once on the category that you wish to modify.
It is also possible to manage these settings remotely via the http://familysafety.microsoft.com/. This allows you to add restrictions even when you are not home in the event that you find something concerning in a child's activity report. Please note to use the Family Safety web site, you must be using a Microsoft account on your computer rather than a local account.
For more information about all of the setting in these categories, please read the following sections.
By default, Family Safety is configured to allow access to all web sites, but you can modify this behavior to only allow your child to visit certain web site categories or even specific sites. If you place restrictions on a web site and your child visits it, the site will be blocked. They will then be presented with a message stating that their parent needs to provide permission to access the site. The parent can then enter their login info to allow their child to continue to the site.
If you wish to restrict web sites, you can select the Child can only use the websites I allow option, which will enable two other settings called Set web filtering level and Allow or block specific websites.
If you click on the Set web filtering level you will be brought to a screen where you can select the restriction level you wish to use for web sites.
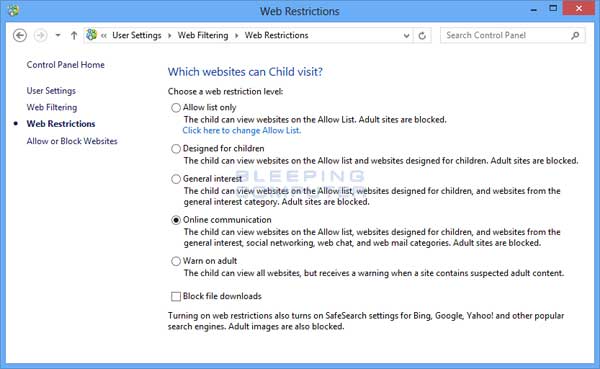
Figure 9. Web Restrictions
At this screen you should select the level that you wish to use for your child. You can also select the Allow list only option that will only allow the web sites you specifically allow in the Allow List, which will be described next. Furthermore, you can override restriction level settings by specifically adding a site in the allow list.
The Allow or Block List setting allows you to specify the particular sites that you your child can or cannot visit. The sites you enter in this section override the web restriction you previously setup. This means that if you add a site to the Allow list and it's not in the restriction level you selected, they will still be able to visit it. The reverse holds true as well for sites you add to the block list. Even if the site is part of the category you allow, the child will not be able to visit it because you specifically blocked it
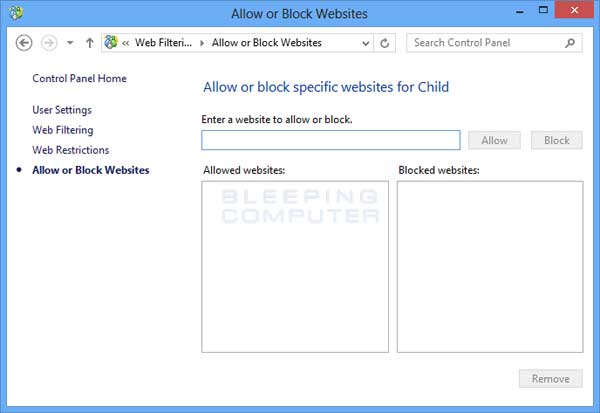
Figure 10. Allow or Block Websites
To allow or restrict a site, simply enter the address in the field and press the Allow or Block buttons. When entering the address, you can enter the domain (example.com) and every page on that domain will be blocked. If you wish to specific a specific page, then you should enter the entire address and press the desired permission.
For example, if you block example.com then every web page on that domain will be blocked. On the other hand, if you block example.com/games/ only web pages under the games folder will be blocked, but the child can access other pages on the example.com domain such as example.com/forums/.
The Time Limits section is used to configure specific times or the amount of time a child can use the computer. By default, Family Safety allows a child to use the computer whenever they want and for as long as they want. To restrict their usage you can use the Set time allowance and Curfew settings.
If you click on Set Time Allowance you will be brought to a screen where you can specify how much time per day they are allowed to use the computer.
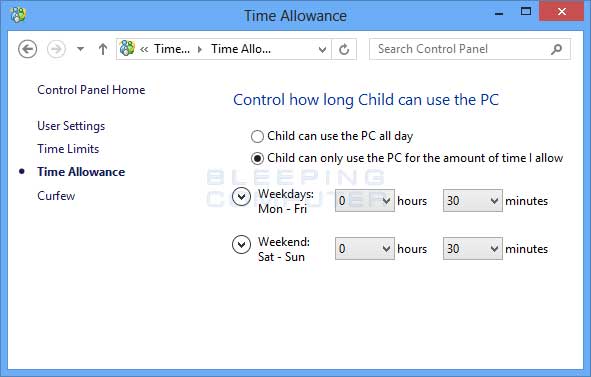
Figure 11. Time Allowance
Please note that you can specify different allowances for the weekdays and weekends in case you wish to give them a bit more time during the weekend.
If you select the Curfew option you will be brought to a screen where you can specify what hours of a particular day the child cannot use the computer.
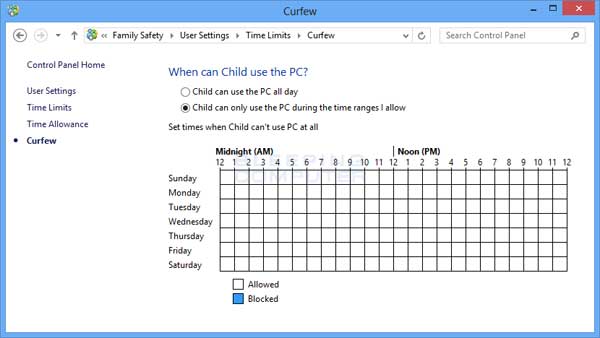
Figure 12. Curfew Settings
To select the time frame per day that they cannot use the computer simply left click on the beginning time and drag to the right. The time frame that they are not allowed to use the computer will become highlighted in blue and the child will not be able to use the computer during those times.
Configuring Windows Store and game restrictions
The Windows Store and game restrictions section allows you to specify the games that you wish to allow your child to play. By default, Windows 8 will allow your child to play every game installed on the computer. To change this setting you should select the Child can only use games and Windows Store apps that I allow option. This will enable two other options called Set game and Windows Store ratings and Allow or block specific games.
The Set game and Windows Store ratings section allows you to select the games rating level that is appropriate for your child.
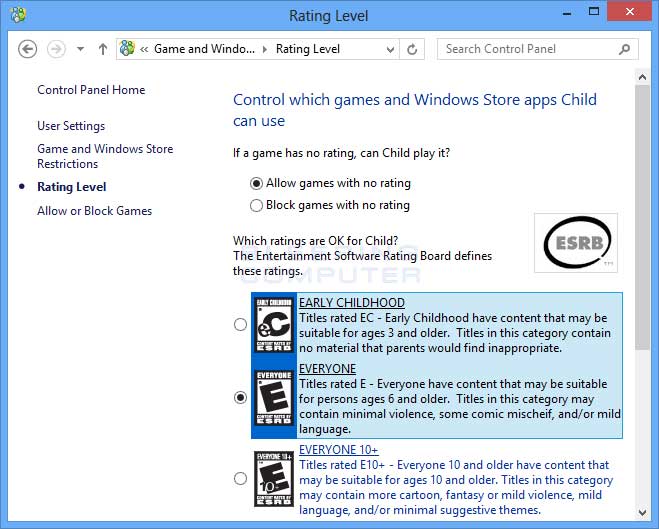
Figure 13. Game Rating Level
You can also specify whether or not you wish to block games that do not have a rating. To changing the rating system Family Safety uses, please see here.
If you wish to allow or block specific games regardless of their game rating, you can select the Allow or block specific games option. This will open a screen that allows you to specify how you wish a particular game to be handled.

Figure 14. Allow or Block Games
This screen will contain a list of all installed games and whether or not you wish to use the rating setting, always allow it, or always block it. Once you make the desired changes, you can close the Allow or Block games screen.
This category allows you to specify what applications on a computer they are allowed to use. By default, this setting is configured so that a Child can use all apps on the computer. If you wish to restrict the applications a child can use, please select the Child can only use the apps I allow option. When you select this option, a list of available programs will be displayed.
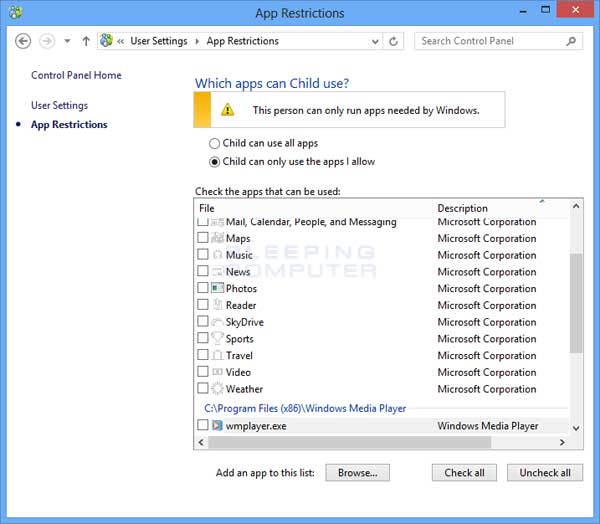
Figure 15. App Restrictions
To allow a child to use a particular application, simply place a check mark next to the desired app. If the app you wish them to use is not list, then you can click on the Browse button to select the executable (.exe) file that you wish the child to use. When you are done selecting the applications, you can go ahead and close the App Restrictions window.
Changing the Rating System that will be used with Family Safety
It is possible to change the game rating system that will be used by Family Safety. As different countries use different rating systems, it is important to select the one that is appropriate for your child and location. To do so, please click on the Rating Systems link shown in the main Family Safety screen as seen in Figure 5. This will open a screen showing a list of all the rating systems supported by Family Safety.
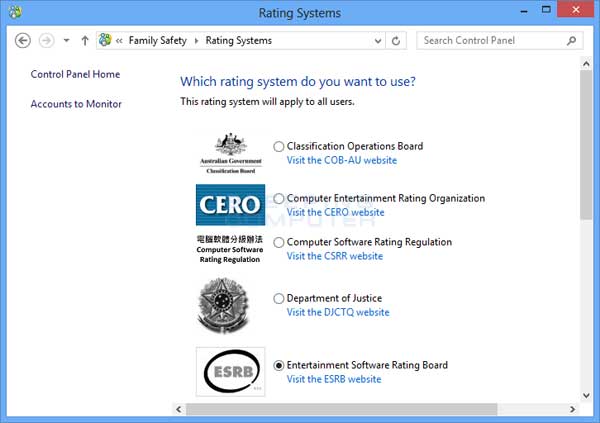
Figure 16. Rating systems supported by Windows 8
Scroll through the list of rating systems and select the one you wish to use. Family Safety will now use this rating system when restricting access to a particular game.
To view the activity reports for a particular child, you need to go to their Family Safety settings screen as shown in Figure 8. Once in that screen you should see an option to View activity reports. When you click on that option a screen will open that shows the past weeks activity for the child.

Figure 17. Activity Report
You can then look through the different activity categories on the left hand navigation bar to see what other activity the child did this week.
You can also access your child's activity through the familysafety.microsoft.com web site. In order to use this site, you must be using a Microsoft account instead of a local account. Once you are logged into the Family Safety website, you have full access to your children's activity reports as well as the ability to modify their restrictions remotely.
Question: How do I enable Family Safety on a computer connected to a domain?
Windows is configured to not display Family Safety options on a computer connected to a domain. To enable Family Safety on a Domain you can use the Group Policy Editor and enable the Make Family Safety control panel visible on a Domain policy. This policy can be found under Local Computer Policy\Administrative Templates\Family Safety.
Question: How do I add another parent to Family Safety so that they receive activity reports?
If you want another parent to receive activity reports, you can add them through the http://familysafety.microsoft.com/ web site. Once logged in, you will see two links under the list of family members. The first link Add a new parent, allows you to add a parent who does not have an account on the Windows 8 computer. The second link, Make a family member a parent, will allow you to select an existing account to add as a parent. Once you add a parent, they will start to receive activity reports as well.


