How to format a floppy in Windows
Lawrence Abrams
- April 27, 2004
- Read 36,964 times
Table of Contents
Introduction
Everyone knows what a floppy disk is, but a common question, is how do I clean out a floppy so that it can be used again? I have spoken to many people who have said that after they store information on a floppy they throw them out as they do not know how to erase the files on them so that it is an empty and clean disk. This tutorial will cover how to reformat a floppy disk so that you can reuse it as you wish. In this way you will not have to throw out your used floppies, but can instead keep using them over and over.
Note: The images in this tutorial are taken from Windows XP , but the method shown here should still apply for Win95/98/ME/2000.
How to format a floppy in windows
Step 1: Insert the floppy you would like to erase into the floppy drive of your computer.
Step 2: Click on the Start button, then click on run.
Step 3. The run dialog box should now be shown. Type explorer in the Open: field and press the OK button. Alternatively, you can press down on the Windows key on your keyboard, which is generally located between your left Control and Alt keys and looks like a small flag, and while holding that key down press once on the letter E.
Both methods will open Windows Explorer. After Windows Explorer is opened you should see a screen similar to Figure 1 below.
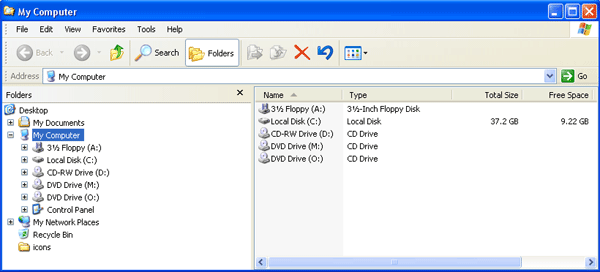
Figure 1. Windows Explorer
Step 3: Click once on My Computer as show in Figure 1 above to highlight it.
Step 4: Click once on the Floppy Drive, usually the A: drive. It should now be highlighted.
Step 5: Click on the File menu and then click on the Format option as shown in Figure 2 below.
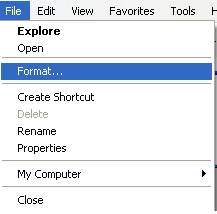
Figure 2. Select the Format Option under the File Menu
Step 6: After you click once on Format as shown in Figure 2 above. You will see a screen similar to Figure 3 below.
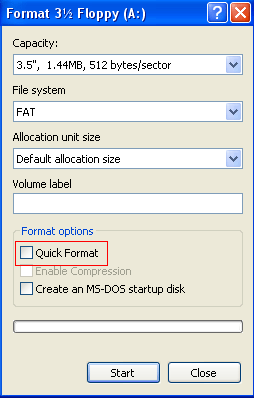
Figure 3. Format Dialog Box
Step 7: Type in a descriptive name in the Volume Label field for this floppy or leave it blank. This is optional, so it is up to you.
Step 8: Place a checkmark in the Quick Format box designated by the red box in Figure 3 above.
Step 9: Press the Start button. You will get a confirmation box as shown in Figure 4 below.
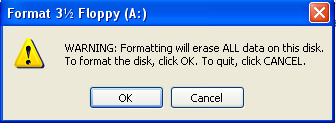
Figure 4. Confirmation
Step 10: If you want to continue formatting this floppy press the OK button, otherwise press Cancel.
Step 11: Windows will now format your floppy. If it has problems Quick Formatting the floppy, then it will tell you so, you should tell it continue formatting the floppy. When it is done formatting, you will be presented with a screen as shown in Figure 5 below telling you the format is complete.
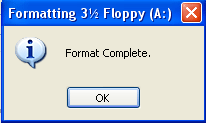
Figure 5. Format Complete
Step 12: Press OK and then Close.
Your floppy is now ready to be used.
As always if you have any questions please feel free to post them in our computer help forums.
--
Lawrence Abrams
Bleeping Computer Windows Basic Concept Tutorials
BleepingComputer.com: Computer Support & Tutorials for the beginning computer user.


