How to add Gmail to Windows 8 Mail
Lawrence Abrams
- November 26, 2012
- Read 231,287 times
To add Gmail to Windows 8, click on the Mail tile in the Windows 8 Start Screen. This will launch the Mail app, which you will be using to set up your Gmail account. If you have not previously used the Mail app you will be presented with a screen asking for your Microsoft Account information.
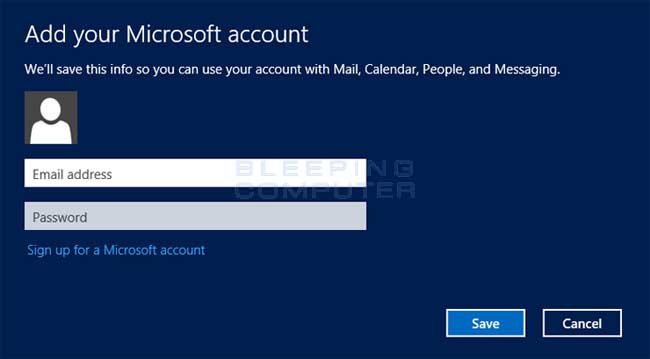
If you do not have a Microsoft Account, please click on the Sign up for a Microsoft Account and create one. Otherwise, enter your account information and click on the Save button.
If you used your Gmail address as the email address for your Microsoft Account, you will automatically be prompted to add the Google account to Windows 8. If you used a different email provider for your Microsoft Account then click on the Google option under the Add your email accounts section. Finally, if you already have another email account configured in Mail, then use the Windows+I keyboard combination (Hold the Windows key and the I key at the same time) to open the Mail Settings screen. Then click on the Accounts option to add the new Google Gmail account.
You should now see a prompt asking you to enter your Google account information.
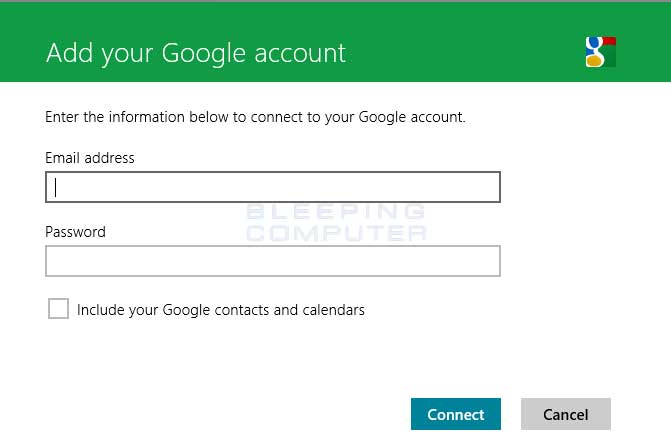
Enter in your Gmail address and then type in your password. If you wish to use your Google Contacts and Calendars, then please check the Include your Google contacts and calendars check box. Then click on the Connect button. The mail app will now connect to Gmail and load your email.
If you are receiving an error when trying to setup your Gmail account in Windows 8, please make sure your Mail app is up-to-date and confirm your login name and password by logging into Gmail via a web browser. Then try setting up your account again. If you continue to have difficulties or receive an error stating That email address or password didn't work. Double-check them and try again., then it is possible that you have the two-step verification security settings enabled for your Google account. If that is the case, then we need to login to your Google account via a web browser and create a special application-specific password that can be used for setting up your account in Windows 8.
To create a application-specific password, login to your Google account by going to the following URL and logging into your account:
Once you are logged in click on the Security category and you should see if the 2-step verification setting is enabled on your account as shown below.
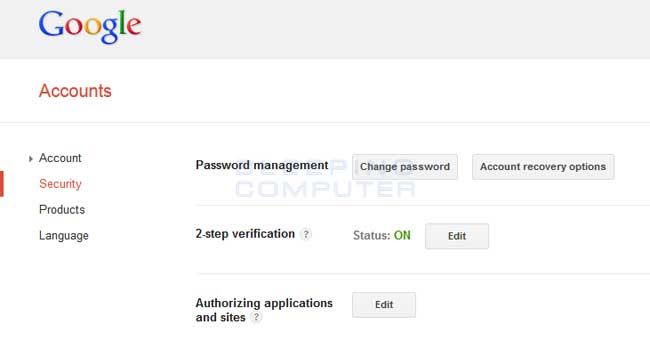
If it is enabled, click on the Edit button next to the 2-step verification status. When you are at the 2-step verification page, click on the link labeled Manage application-specific passwords. When you click on this link, Google may require you to enter your password again for extra security. Enter your password and you will now be at a screen where you can manage the application-specific passwords that you have created.
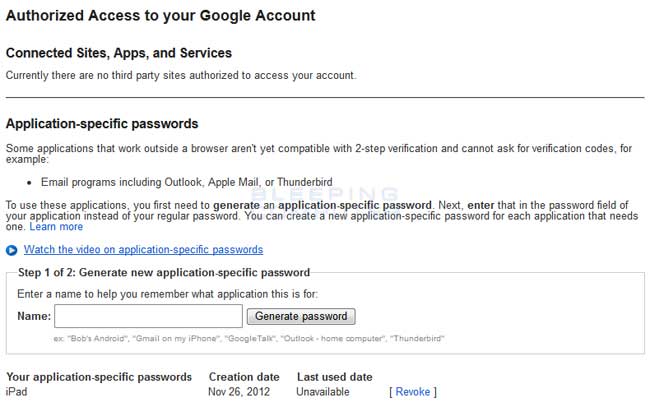
To create a password that we will use for Windows 8, type a name that you want to associate with this password in the Name field. This name should be something that is associated with the particular application that we are generating the password. For example, if this is your office Windows 8 computer, you could type Office Windows 8 Mail as the name. When you have entered the name you wish to use, click on the Generate Password button. You will now be shown a screen that displays the password that you will use when setting up Gmail on your Windows 8 computer or tablet.
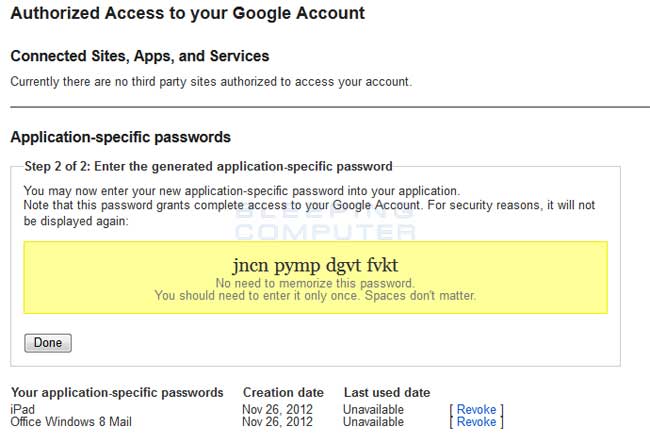
This password is meant to only be used once and will never be shown again. Therefore, write down the password and click on the Done button. If you forget the password or misplace it, do not worry as you can always log back in and Revoke it. This makes the password unusable by any applications is or wants to use it.
Now that you have this password, you can go back to the Mail app and configure your Gmail account again. This time, though, use the application-specific password that we just generated as the password to your Gmail account. You should now be able to properly connect to your Gmail account in Windows 8.
If you have any questions regarding these steps, please ask us in the Windows 8 Forum.


