How to use the Vista Windows Memory Diagnostics Tool
Lawrence Abrams
- February 23, 2007
- Read 212,587 times
The Vista Windows Memory Diagnostics Tool is a program that you can use to run various tests on the physical memory installed on your computer. When memory in a computer starts to fail, your computer can act in unpredictable ways such as rebooting on its own, freezing, and crashing programs. This utility performs a series of tests on the physical memory and lists any errors that are found. In this way you can determine if the problems you are encountering when using your computer may be related to the RAM going bad or some other problem.
There are a couple of ways that you can start the Windows Memory Diagnostics Tools; from within Windows Vista., from the Windows Recovery Environment, and from the Windows Boot Manager. The first method while in Vista is to click on the Start Button, type memory in the search field, and then click on the Memory Diagnostics Tool icon when it appears. Another way is when Vista finds problems that may be associated with faulty memory. When this happens, Windows Vista will prompt you to diagnose the problem by testing your RAM. Both of these methods will require you to boot your computer, which will automatically start the Windows Memory Diagnostics Tool.
To access the utility within the Windows Recovery Environment you need to insert your Vista DVD into the DVD drive on your computer and turn your computer on. Your computer will start and you should see the BIOS listing the hardware on your computer and other information. When that information has been cleared, your computer will see that a bootable DVD is inserted and present a prompt similar to Figure 1 below.
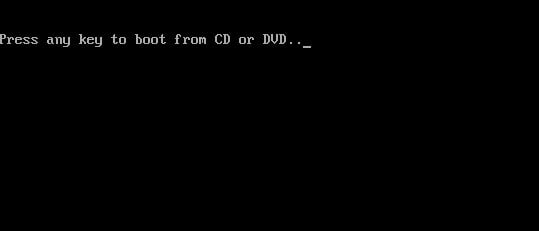
Figure 1. Boot the computer from the CD or DVD
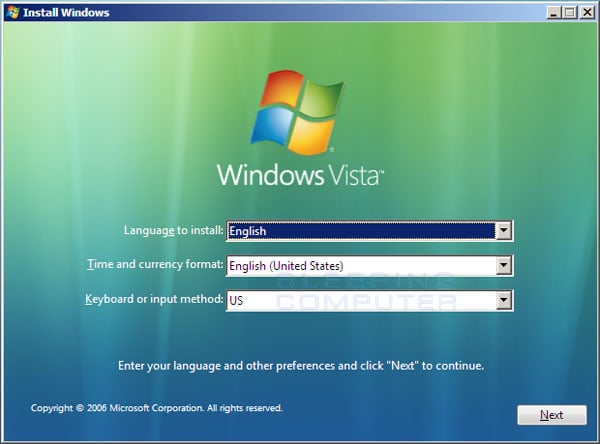
As you want to boot the computer from the Windows Vista DVD, you need to press a key, any key will do, on your keyboard when you see this prompt. It is possible that the DVD that came with your computer does not allow you to boot off of it. If this is the case, then your computer manufacturer most likely installed the Windows Recovery Environment directly to a small partition on your hard drive. To access this partition, you would slowly tap the F8 key on your keyboard after the BIOS information clears from your screen until you see the Windows startup menu. From this menu use your arrow keys to select the option for the Windows Recovery Environment and press the enter key on your keyboard. You should now see a black screen with a white status bar at the bottom stating Windows is loading files.... After a while, the status bar will turn completely white and you will see a screen stating that Windows is loading. The Windows Setup environment will continue to load and when finished you will be presented with a screen similar to Figure 2 that prompts you for information about your location and language
 .
.
Figure 2. Configure language and location options in Vista Setup
At this screen you should configure the Language to install, Time and currency format, and Keyboard or input method options so that they are set correctly. When done, press the Next button. You will now be at the main Windows Vista setup screen where you would normally install Vista on to a computer.
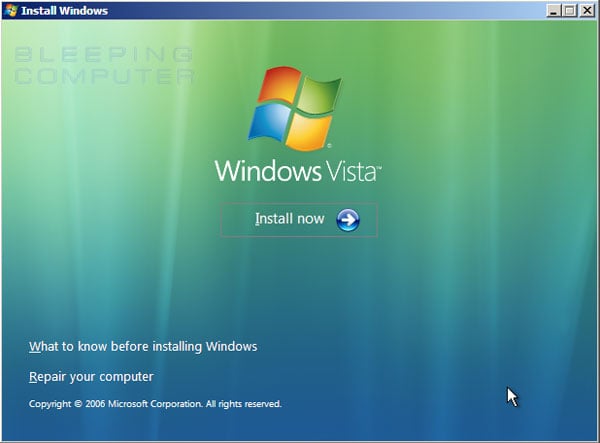
Figure 3. Windows Vista Setup options
As we want to repair the computer, you should click on the Repair your computer option. This will bring you to a new screen where the repair process will look for all Windows Vista installations on your computer. When done you will be presented with the System Recovery Options dialog box as shown in Figure 4 below.
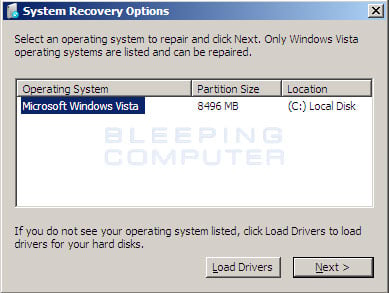
Figure 4. System Recovery Options
Select the Vista installation you would like to repair and if there are drivers you need to load in order for Vista to access any of your drives or other components, then you should click on the Load Drivers button to load them. When ready, press the Next button to continue. If the repair process does not detect any problems starting Vista, it will display a list of available recovery tools. If it does detect a problem it will attempt to perform a Startup Repair to automatically fix these problems. If you would like to allow this process to continue, then you can read more about it here. Otherwise click on the Cancel button and select the View advanced options for system recovery and support option to see the list of recovery tools.
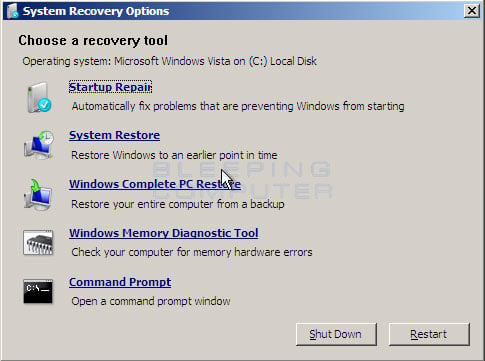
Figure 5. System Recovery Options
At this screen you would then click on the Windows Memory Diagnostic Tool option. This will present you with a screen asking if you want to restart and run the tool now or on the next restart of the computer.
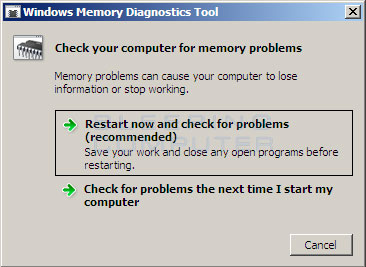
Figure 6. When to run the Windows Memory Diagnostics Tools
If you want to try other recovery tools while you are in the Windows Recovery Environment, then select the Check for problems the next time I start my computer option so that you can continue using the other tools. On the other hand, if you want to immediately run memory tests on your computer then you should click on the Restart now and check for problems (recommended).
By far the easiest and quickest way to start the Windows Memory Diagnostics Tool is to do so from the Windows Boot Manager when you reboot your computer. To do this remove all bootable CDs and DVDs and start your computer. After the BIOS information is shown on the screen, and as there is pause with a black screen before Windows normally starts, you would press your spacebar key. This would put you into the Windows Boot Manager as shown below.
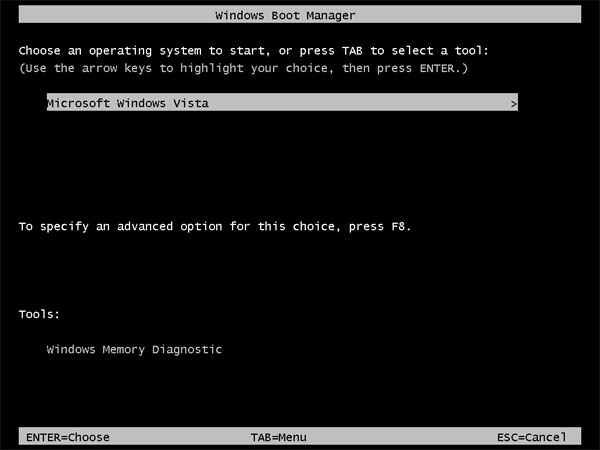
Figure 7. Windows Vista Boot Manager
At the Windows Boot Manager screen, press the TAB button on your keyboard to select the Windows Memory Diagnostic tool and then press the enter key to start it. Regardless of how you entered the Memory Diagnostics Tool you will now be at the diagnostic tool's main screen and the tool will automatically start to test your memory. These tests can take quite a while, so please be patient while they run.
.
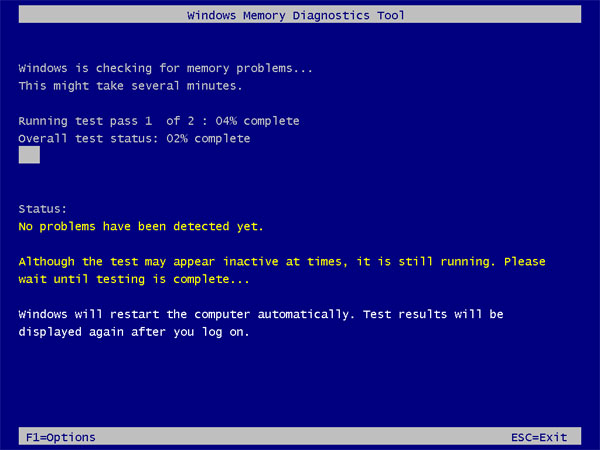
Figure 8. Windows Memory Diagnostics Tool
If you would like to make changes to the tests as they are conducted you can click on the F1 key on your keyboard. This will present a new screen where you can change the options on how the Windows Memory Diagnostic Tool will operate.
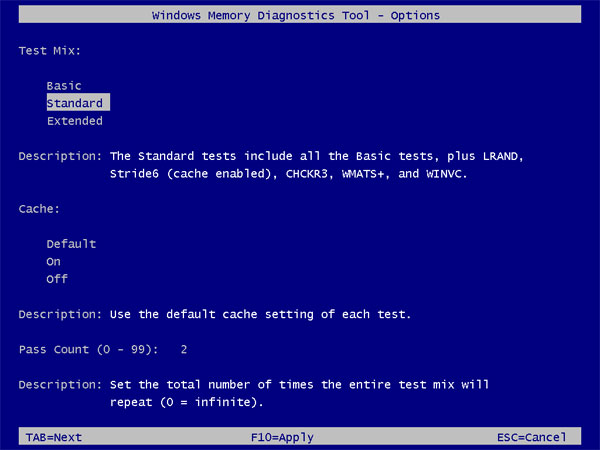
Figure 9. Windows Memory Diagnostics Options
To change any options you can use the TAB key on your keyboard to switch between option categories and then the arrow keys to select the particular option. When done making your changes you would then click on the F10 key to save them. By default the tool uses the Standard tests to check your memory. If you want a more exhaustive test set, then you should change your tests to the Extended one. If you use the Extended tests, the tests will take a long time to complete so it is advised that you let the tests run overnight so that you can see the results the next day.
The other two options are Cache and Pass Count. The Cache option allows you to specify whether you want the tests to use the CPU's built-in cache. When you run the test without the cache enabled, the test will perform slower, but be more thorough. If you select the Default option, the tests will use the cache depending on how it is setup in the specific tests. The defaults for the Basic and Standard tests are for the cache to be enabled and to be disabled in Extended tests. The other two options, On and Off, override the default settings found in the test type. The other option, Pass Count, allows you to specify how many times the tool will perform each test. By default the tool will run the entire test 2 times.
As the tests run, if any errors are found they will be displayed in the main diagnostic screen. If the first test pass, running the Standard tests, is completed without any errors being found it is likely that your memory is operating properly and it is uncommon for errors to be found on further passes using the same tests. If no errors are found, and you wish to try a more exhaustive test, then it is advised you use the Extended tests overnight. When the tests are complete, the tool will automatically reboot your computer and the next time you log back into Vista the results of the test will be displayed as seen in Figure 10 below.

Figure 10. Windows Memory Diagnostics Tool Results
When testing your memory, if errors are found, the Windows Memory Diagnostics Tool will attempt to determine which particular memory module in your computer is causing these errors. If that information is available, it will be stated in the results. If bad memory is found then you will need to remove that memory and replace it with a functioning replacement. For information on how to remove and install memory it is advised that you read this tutorial: Understanding, Identifying and Upgrading the RAM in your PC.
If you are still having problems after using this tool, then you can try the other advanced repair tools. Tutorials on how to use these tools can be found below:
- How to automatically repair Windows Vista using Startup Repair
- How to use the Command Prompt in the Vista Windows Recovery Environment
- Using Windows Complete PC Restore to restore your computer
- Using System Restore from the Vista Windows Recovery Environment
As always if you have any comments, questions or suggestions about this tutorial please do not hesitate to tell us in the Windows Vista Help Forums.


