Using Spybot - Search & Destroy to remove Spyware from Your Computer
Lawrence Abrams
- March 25, 2004
- Read 611,338 times
Table of Contents
- Introduction
- Installing Spybot - Search & Destroy
- Starting Spybot - Search & Destroy for the first time
- Using Spybot - Search & Destroy
- Using Spybot - Search & Destroy's Immunize Feature
- Restoring fixed entries with Spybot - Search & Destroy
- Conclusion
If you suspect that you have spyware installed on your computer, then an excellent tool called Spybot - Search and Destroy can be used to remove them. Follow the instructions below to learn how to use Spybot - S&D to remove these programs from your computer. Word of warning, though, Spyware can sometimes be integrated tightly into software that you use, and if you remove the spyware, that software may not function correctly. So be careful as to what you remove.
If you would like to learn more about Spyware and Browser Hijackers you can click here: Understanding Spyware and Browser Hijackers
Installing Spybot - Search & Destroy
The first step for spyware/hijacker removal is to download and install Spybot - S&D from the link below. After it is installed, continue with the following steps.
You can download Spybot - S&D from the following link: Spybot - Search and Destroy
When you have downloaded the program, double click on the downloaded file to start the installation. Follow the default selections, agreeing to the user agreements, and pressing the Next button until you get to the Select Additional Tasks screen shown below in Figure 1.
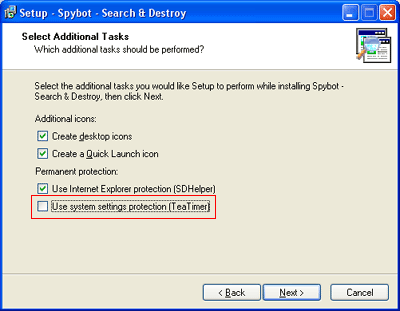
Figure 1. Installing Additional Tasks
Make sure you put a checkmark in the last checkbox labeled "Use system settings protection (Tea Timer)". After you place a checkmark in that box all checkboxes should have a check in them. Before you continue with the next step, let me explain what the permanent protection settings do.
SDHelper - This program will integrate into your Internet Explorer browser and block your browser from downloading "bad" programs from known malware sites.
TeaTimer - This program will constantly run on your computer in the background and notify you of any changes to system settings on your computer before they are allowed to happen.
NOTE: If you install TeaTimer and have another program that does a similar task, like SpywareGuard, they will both work, but you will get notifications from both of the programs. If you do not want double notifications, and you choose to use Spybot - S&D's TeaTimer, make sure you uninstall any other program that will do a similar task.
When you are ready you can now press the Next button and then the Install button to start the installation process. When the installation process is complete you will see an screen similar to Figure 2 below.
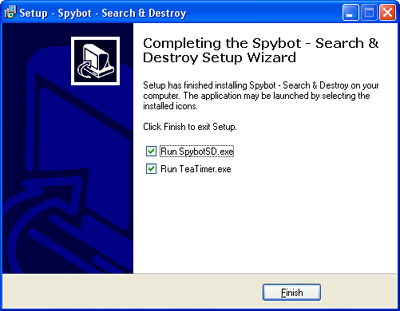
Figure 2. End of Installation.
Make sure there are checkmarks in both boxes as shown in Figure 2 above and then press Finish. Spybot - S&D will now start and TeaTimer will load into memory as a background application.
Starting Spybot - Search & Destroy for the first time
Step 1: Launch Spybot - S&D
If you told Spybot to launch when it was done installing, the program should now be open. Otherwise find the icon on your desktop and double-click on it. When you use Spybot - S&D for the first time, it will prompt you for certain tasks to complete. You should complete all tasks as described below.
Step 2: Backup your Registry
The first screen, similar to Figure 3 below, is to backup your registry in order to be able to restore from it in the future. This can cause no harm, so it is a worthwhile task to do.
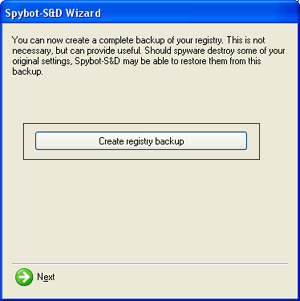
Figure 3. Backup your Registry
You should click on the Create registry backup button, designated by the red box in Figure 3 above. This will create a backup of your registry and may take a few minutes so do not be alarmed if you feel the program is hanging. When it is completed, you should then click on the Next button.
Step 3: Update Spybot - S&D
The next screen you should see will be similar to figure 4 below.

Figure 4: Update Spybot - S&D
Click on the Search for updates button, as shown in the red box in figure 4 above. This will make Spybot connect to a server on the Internet and determine if there are any available updates for Spybot. If there are no updates available it will tell you so, and then you can click on the Next button.
If updates are available then the Download all available updates button will become available and you should click on that following the prompts. Unfortunately there are no new updates as I am writing this tutorial so I can not show you what it looks like.
When the updates are installed click on the Next button.
Step 3: Immunize Internet Explorer
You will now see a screen similar to figure 5 below.

Figure 5: Immunize Internet Explorer
You should now click on the Immunize this system button designated by the red box in figure 5. This will immunize Internet Explorer so that you will not be allowed to download and run known malware or other malicious programs. After you click this button you should see an image similar to Figure 6 below which will show you that Spybot successfully immunized Internet Explorer.

Figure 6: Successful Immunization
You should now click on the Next button and then click on then click on the button labeled Start using this program to begin using Spybot - Search & Destroy. To learn how to use this program continue reading the next section.
Important Note: For people using the new version 1.3, it is ignoring a few malware products by mistake so it will not find them. To fix this click on the Mode menu option at the top and click on Advanced Mode. Reply Yes to the confirmation when it asks you. This will change the screen and give you different options. Click on Settings on the left hand side and then click on the Ignore Products section. Click on the All Products tab, and scroll through all the listed products and make sure there are no checkmarks in any of them. If there are, remove the check marks. Then click on the Mode menu option and switch back to Default Mode again.
Using Spybot - Search & Destroy
Step 1: Start Spybot - S&D
If Spybot - S&D is already running then you should skip to step 2.
On your desktop, double click on the icon for Spybot - S&D. The program will now open and will appear as shown in Figure 7 below.
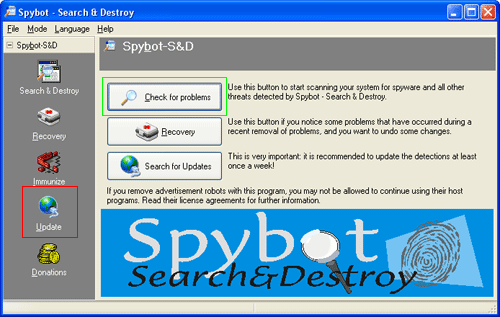
Figure 7: Spybot - S&D welcome screen
Step 2: Update Spybot - S&D before using it
Click on the Update button which is marked in red in the figure above.
You will then be presented with another screen shown in Figure 8. This screen will allow you to check for any new updates to the program and then to download and install them. It is very important that you do these steps every time you run Spybot - S&D to ensure you have the latest updates to the program. This will enable Spybot - S&D to recognize and remove additional Spyware/Hijacking threats as they are released.
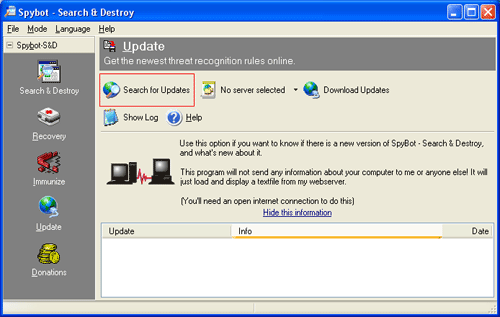
Figure 8. Search for updates
Click on the Search for Updates button. When you do this, Spybot - S&D will connect to a master server and determine if any updates are available for your version of the software. If there are available updates, they will be listed and you will be given the option to download them. If there are no updates, it will notify you of this and you will not have the option to download anything.
If there are updates you should download all of the available updates that are listed. You should then select a location to download the updates from that is closest to your geographical area. If there are no locations that are close to you geographically then pick the closest one.
You would then click on the Download Updates button and Spybot - S&D will download the updates, install them, and restart itself so that the program is now using the new updates.
Note: Once a new update is released for version 1.3 I will update this tutorial with more images showing this process.
Step 4: Check for Problems with Spybot - S&D
After the program restarts, you will be presented with the same screen as shown in Figure 7 above. This time you will want to click on the button designated by the green box, called Check for Problems.
The program will automatically start and search your hard drive, registry, and other locations for traces of Spyware, Hijackers, and other malware. If it does not start checking for problems immediately, click on the Check for Problems button. When it finds software that it recognizes, it will add it to a list of items to remove. This search can take a while, so go do something while it searches. As of this writing, Spybot - S&D knows a little over 16,000 different types of Spyware and Hijackers, so as you can imagine it may take a while. Figure 9, below shows Spybot - S&D in a scanning state as it searches for Spyware and Hijackers. The red box designates the current item it is looking for and how far along it is in the scan.
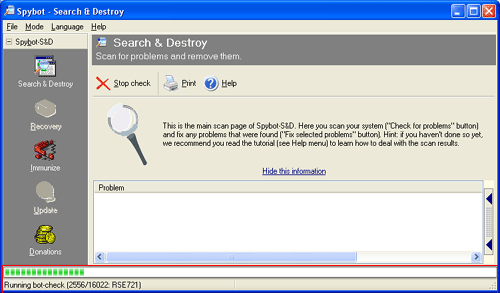
Figure 9. Check for Problems
Step 5: Examine listing of found items
Once the scan is done, it will present you with a screen similar to Figure 10. This screen will list all Spyware and Hijackers that Spybot - S&D has found. This list of found items is designated by the red box in the figure below. The item surrounded by the green box allows you to see information about the selected item which will be discussed in Step 6 below.

Figure 10. List of found Spyware and Hijackers
Spybot - S&D will automatically put checkmarks next to the entries that are categorized as malware (Spyware, Hijackers, Dialers, etc). Other entries will not have checkmarks next to them and will be discussed below to allow you to decide if you would like to remove them.
Entries in the list are categorized by their color and are described below:
Red Entries - Entries in red are classified as malware and will automatically be selected for removal by Spybot - S&D.
Green Entries - These entries are usage tracks. Usage tracks are fingerprints left in your system that contain information about what you have done in the past with your computer. Information that is typically stored in these usage tracks are last open files, last used directories, web sites that you have visited, or files that you have opened. Fixing these entries can cause no harm to your system so if you would like to remove them, there will be no harm done.
Black Entries - These entries correspond to internal system settings on your computer. This can be missing help files, missing shared dlls, incorrect application paths, incorrect uninstall information, or broken desktop links. You should not fix these entries unless you are absolutely positive you know what you are doing. It is possible to seriously corrupt your system if you fix the wrong entries.
Step 6: Examining Information about listed entries
It is possible to see what registry entries or files correspond with the found items. Examine figure 11 below and we will describe how to see information about each entry.
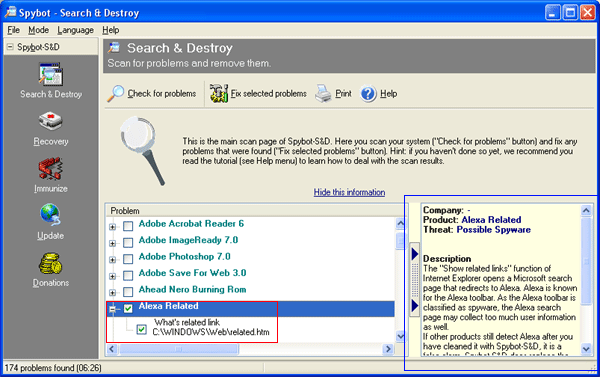
Figure 11. Spyware/Hijacker Information
If you click on the + sign next to an entry information will drop down below that particular entry telling you what file or registry entries are associated with that particular entry as show in Figure 11 above. In this example, designated by the red box, I am looking at the file that is associated with Alexa Toolbar's "Related Links" feature which is saved in the c:\windows\web\related.htm.
If you would like to see more detailed information about what each entry means, you can click on the button designated by the green box in Figure 10 above. This will bring up much more detailed information about what that particular entry means. When you are done reading the entry you can close that pane by clicking again on the button with the arrows on it. You can see an example of this detailed information in the section designated by the blue box in Figure 11.
Step 7: Fixing listed items with Spybot - Search & Destroy
To fix specific entries in the list you should put a checkmark next to each item you would like to fix. Spybot - S&D will automatically put a checkbox in any malware it finds. After selecting or deselecting any of the programs you would like to remove, you should click on the button labeled Fix selected Problems, designated by the blue box in Figure 10.
If you have Windows XP or Windows ME and have System Restore enabled, Spybot - S&D will create a restore point before continuing. This will allow you to revert back to previous configurations in case something goes wrong or your computer starts acting incorrectly. Spybot - S&D will then ask you for confirmation on whether or not your would like to continue. Press the Yes or No button depending on what you would like to do. If you specify Yes, Spybot - S&D will proceed to remove the Spyware.
If it has trouble removing any spyware, because that particular spyware is running memory for example, you will see a screen like Figure 12, asking if it would be ok to run Spybot - S&D on the next reboot before any other applications start running.
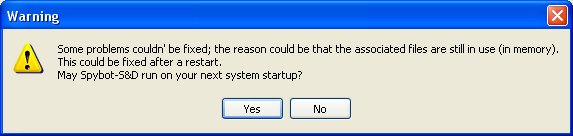
Figure 12. Prompt for Run on next Reboot
You should reply Yes to this. The next time, you reload Windows, Spybot will run automatically and fix any of the programs it could not fix previously.
At this point you will be presented with the list of found entries again, but now there will be large green checkmarks next to the items that Spybot - S&D was able to remove. The ones that are still checked but do not have the large green checkmark next to them will be fixed on the next reboot of windows.
Using Spybot - Search & Destroy's Immunize Feature
Spybot - S &D also has the ability to immunize your computer from downloading and running known malicious ActiveX controls or other programs from known malware sites.
Advanced Tip: ActiveX controls are blocked by adding the CLSID, which is the number between the curly brackets { 000..etc } under the registry key HKEY_LOCAL_MACHINE\SOFTWARE\Microsoft\Internet Explorer\ActiveX Compatibility. You then make a dword value called "Compatibility Flags " and make it the hexadecimal value of 400. This is called the killbit and will stop the program from being able to run on your computer.
Known malware sites are blocked by Spybot - S&D installing a Browser Helper Object (BHO) called SDHelper.dll into Internet Explorer. Spybot will also add its known list of malware sites into your Restricted Sites section of Internet Explorer which removes all permissions to run web programs from that particular site.
You can access the Immunize feature by clicking on the Immunize button on the left hand vertical toolbar. When you click on the Immunize button you will be presented with a screen similar to figure 13 below.
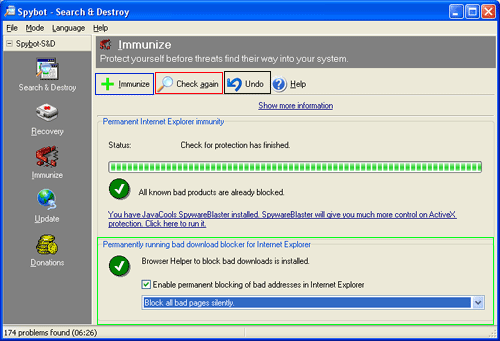
Figure 13: Immunize Screen
This screen allows you to immunize your Internet Explorer from malware sites and the malware itself. If you followed this tutorial when installing Spybot you should be already immunized. This screen has a few options that we will cover below.
If you chose not to immunize your Internet Explorer when installing Spybot - S&D and would like to do so, you can click on the Immunize button, in the blue box in Figure 13 above, to immunize your Internet Explorer.
If you would like to undo the immunization, you can click on the Undo button, in the black box in Figure 13 above, to remove this protection.
If you would like to make sure Internet Explorer has all known malware immunized, you can click on the Check Again button, in the red box in Figure 13. Spybot - S&D will then immunize any missing malware it has in its database. You should do this occasionally to make sure you have the latest protection.
The section, designated by the green box in Figure 13, that is titled Permanently running bad download blocker for Internet Explorer is very important. By putting a checkmark in the Enable permanent blocking of bad addresses in Internet Explorer, Spybot - S&D will stop you from downloading any programs from known malware sites. This feature allows you to specify how Spybot - S&D should react when you visit a malware site and attempt to download something. These options are discussed below:
Block all bad pages silently - Spybot - S&D will block silently with no notification to the user.
Display dialog when blocking - Spybot - S&D will notify you when it is blocking something.
Ask for blocking confirmation - Spybot - S&D will prompt you for confirmation as to whether or not the particular program or script should be blocked.
Though Spybot - S&D has a robust immunization process, it is advised that you use SpywareBlaster for this process instead. SpywareBlaster provides a much greater deal of control over immunization and is updated frequently with new sites and malware. If you have SpywareBlaster installed, Spybot - S&D will notify you that using SpywareBlaster will provide greater control.
We have created a tutorial on how to use SpywareBlaster that can be found here: Using SpywareBlaster to protect your web browser
Restoring fixed entries with Spybot - Search & Destroy
If you have fixed entries with Spybot - S&D in the past and need to revert that fix you can use the Recovery feature. To access this feature you click on the Recovery button on the left hand vertical toolbar. This will present you with a screen similar to figure 14 below:
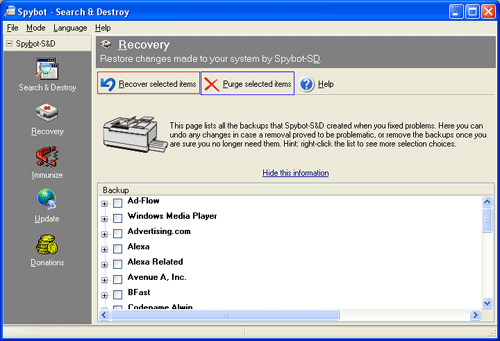
Figure 14: Spybot - S&D Recovery
To recover a previously fixed item, place a checkmark next to the item you would like to fix and press the Recover selected items button designated by the red box in figure 14 above. This will place back the previously fixed item onto your computer. Please use this feature with care as you do not want to reinstall a piece of malware onto your computer.
To purge from your computer these backups, you can select the items you would like to purge by placing a checkmark next to the particular item and then click on the Purge selected items button designated by the blue box in Figure 14 above. This should be done occasionally because these backups do take up some drive space.
Spybot - S&D should be a tool that you run routinely on your computer to check for Spyware and Hijackers
If you are still having problems after running it, then I would recommend that you also run Ad-aware on your computer as well.
A tutorial for Ad-aware can be found here: Using Ad-aware to remove Spyware/Hijackers from Your Computer
If you are still having problems after running both programs, you can read the tutorial on using HijackThis. This is more of an advanced tool, but is another great tool to have at your disposal.
This tutorial can be found here : How to use HijackThis to remove Browser Hijackers & Spyware
For help with your Spyware problems you can leave a message in our computer help forums.
--
Lawrence Abrams
Bleeping Computer Spyware & Malware Removal Series
BleepingComputer.com: Computer Support & Tutorials for the beginning computer user.


