Register a free account to unlock additional features at BleepingComputer.com
Welcome to BleepingComputer, a free community where people like yourself come together to discuss and learn how to use their computers. Using the site is easy and fun. As a guest, you can browse and view the various discussions in the forums, but can not create a new topic or reply to an existing one unless you are logged in. Other benefits of registering an account are subscribing to topics and forums, creating a blog, and having no ads shown anywhere on the site.


Click here to Register a free account now! or read our Welcome Guide to learn how to use this site.

Generic User Avatar
* * * * * 4 votes

How to: Install Puppy-Linux to a VirtualBox VDI on a Windows Host


  • Please log in to reply
8 replies to this topic

#1 achzone

achzone

  •  Avatar image
  • Members
  • 3,990 posts
  • OFFLINE
  •  
  • Gender:Male
  • Location:Melbourne, Australia
  • Local time:03:02 PM

Posted 09 November 2021 - 08:56 AM

Note: This tutorial has been split into four parts / posts to comply with forum image number restrictions. At the end of each post, simply move on to the next one to continue.


I run Puppy Linux FossaPup64 not as a Live CD but as a permanent frugal install that would save its state on each exit or reboot within an Oracle VM VirtualMachine. I had trouble finding a walkthrough that would show me how to do it, despite many searches on the Web and watching various YouTube videos.  


This walkthrough has been created to assist others new to Puppy Linux that may find themselves in a similar position while using BionicPup64 8.0 as an example. Snapshots of every step, as they were done, are included. Other current Puppy builds will be very similar.


It’s a great way to have a permanent Puppy Linux installation on hand.


Pre-requisites:


Windows 10 Host

Oracle VM VirtualBox Version 6.1

A downloaded copy of BionicPut64 8.0 from this link


Let’s get on with it…


Install Puppy Linux to an Oracle VirtualBox machine as a permanent install


Just like when installing any other OS to VirtualBox, we need to create an initial Virtual Machine (VM) template for it.


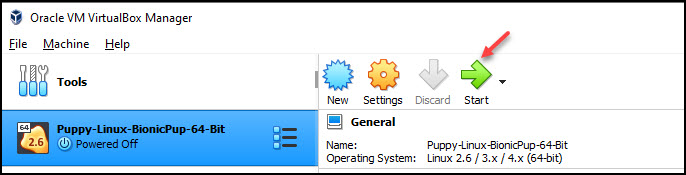
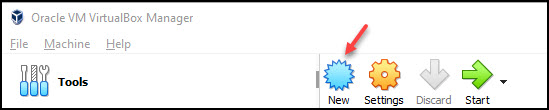
Step 1. Open VM VirtualBox Manager and click the New icon


bp1.jpg


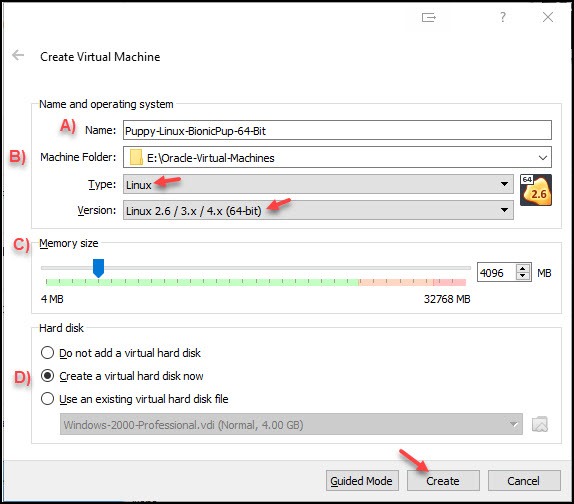
Step 2. Start filling out the “Name and operating system details”


A ) Specify the name of your VM. (Puppy-Linux-BionicPup-64-Bit in this example)


B ) Choose an appropriate location on Windows 10 where VM will be saved


C ) Specify the amount of RAM you’re willing to dedicate to the VM. The default of 1GB (or even less) will be fine, but since I have plenty to spare, I’ve given mine 4GB of dedicated RAM


D ) Select “Create a virtual hard disk now” and then click the Create button


bp2.jpg


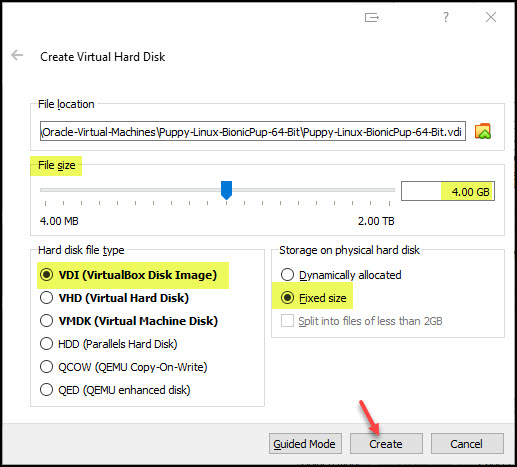
Step 3. Specify the settings of the VirtualBox Disk Image (VDI) - though it’s possible to use a Dynamically allocated VDI, I prefer to use a fixed size, so below, I’m going to specify a 4GB fixed sized VDI disk to install Bionic Pup to. Change that size to suit yourself. 


Once you’re happy with your settings, click the Create button. Your initial VM template will now be created.


bp3.jpg


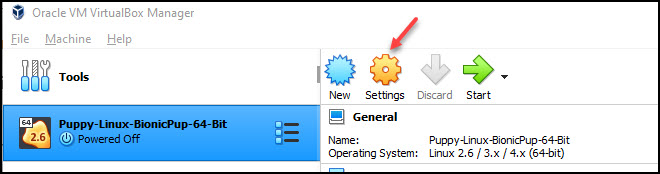
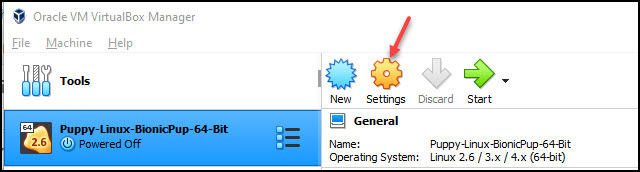
Step 4. Back on the VirtualBox Manager window, time to adjust a few settings to best suit the Bionic Pup install. You could do this later, but I like to get it all out of the way now. Click the Settings button


bp4.jpg


Step 5. I suggest changing the following settings for best performance. 


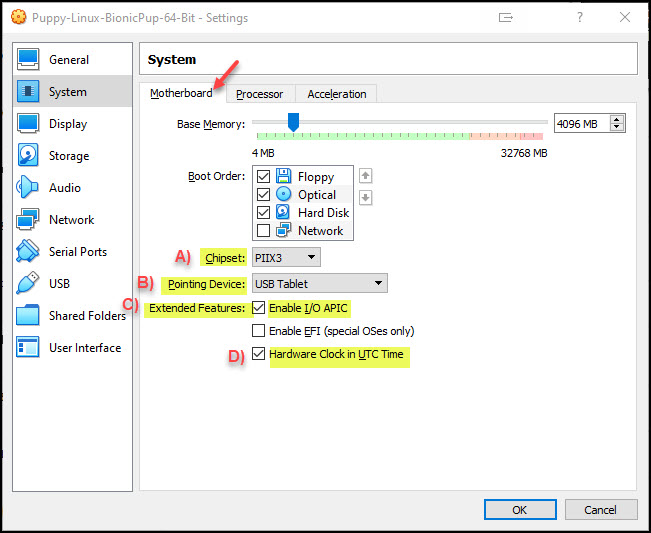
System > Motherboard


A ) Chipset: PIIX 3


B ) Pointing Device: USB Tablet (or PS2/Mouse if that’s what you have)


C ) Extended Features: Enable I/O APIC


D ) Hardware Clock in UTC Time (This is optional)
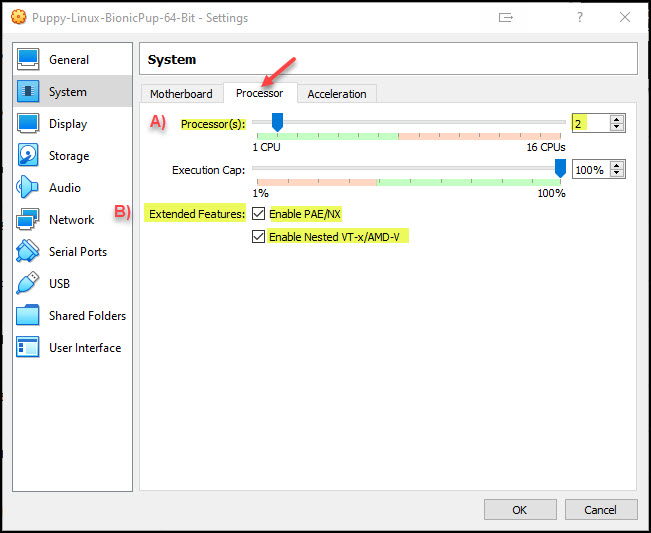
 

bp5.jpg


System > Processor


A ) Processor(s): 2 (or more) depending on how many cores your Hosts processor has. If using an older generation CPU with Windows 10, leaving this to 1 processor will be fine


B ) Extended Features: Enable PAE/NX and Nested VT-x/AMD-V


bp6.jpg


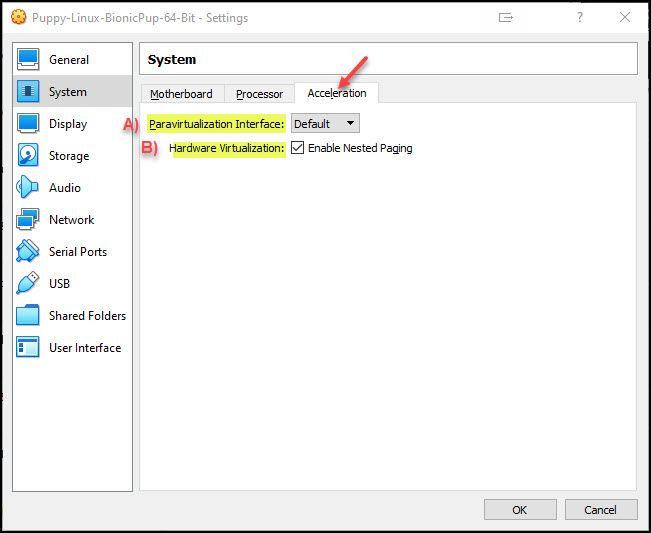
System > Acceleration


A ) Paravirtualization Interface: Enabled


B ) Hardware Virtualization: Enable Nested Paging
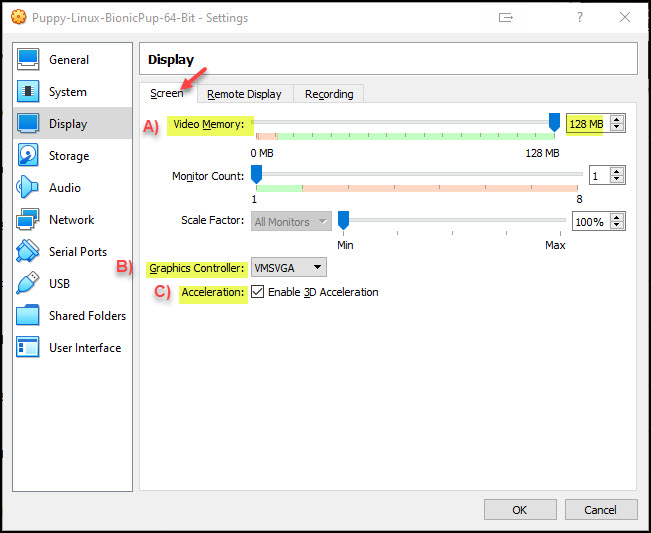
 

bp7.jpg


Display > Screen


A ) Video Memory: 128 MB


B ) Graphics Controller: VMSVGA


C ) Acceleration: Enable 3D Acceleration


bp8.jpg


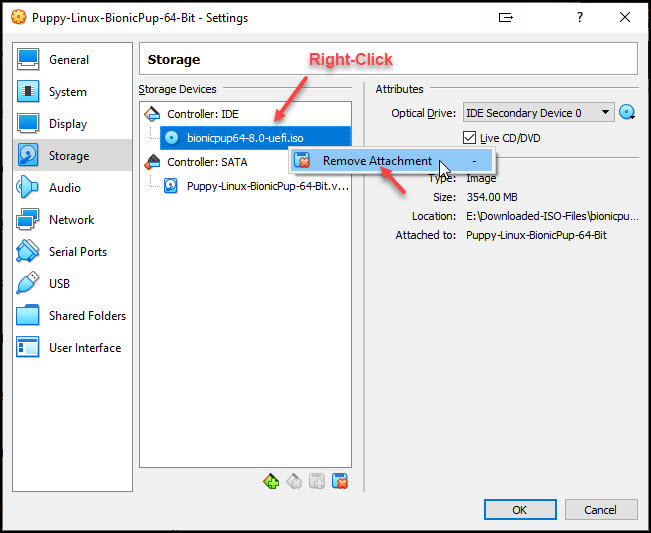
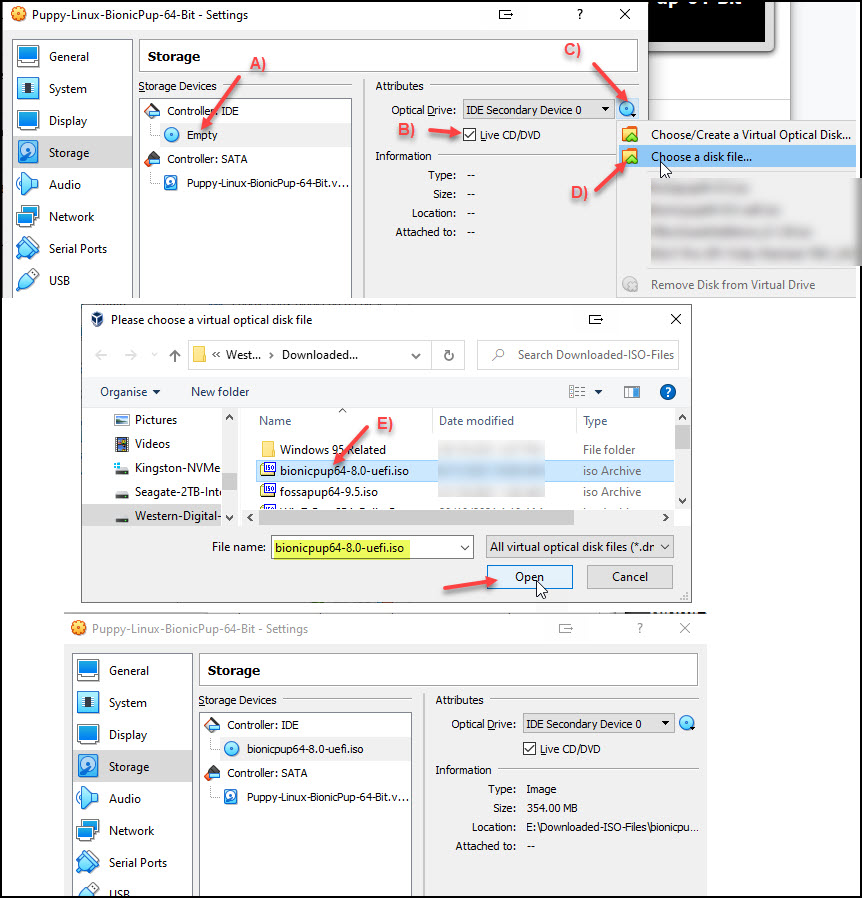
Storage > Controller IDE


This tells VirtualBox to load your downloaded bionicpup64-8.0-uefi.iso file as a Live CD that we’ll be booting with and using to permanently install Puppy later


A ) Click the Empty DVD icon


B ) Check the Live CD/DVD option 


C ) Click the Choose a virtual disk icon


D ) Select Choose a disk file...


E ) Browse to where you saved your Puppy ISO and select it, then click Open
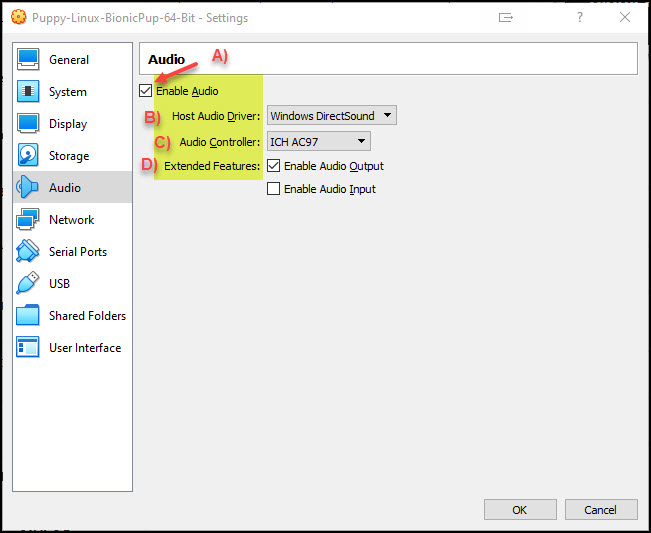
 

bp9.jpg


Audio


A ) Check Enable Audio


B ) Host Audio Driver: Windows DirectSound


C ) Audio Controller: ICH AC97


D ) Extended Features: Check Enable Audio Output (You can also enable Audio Input as well if you’re that way inclined)
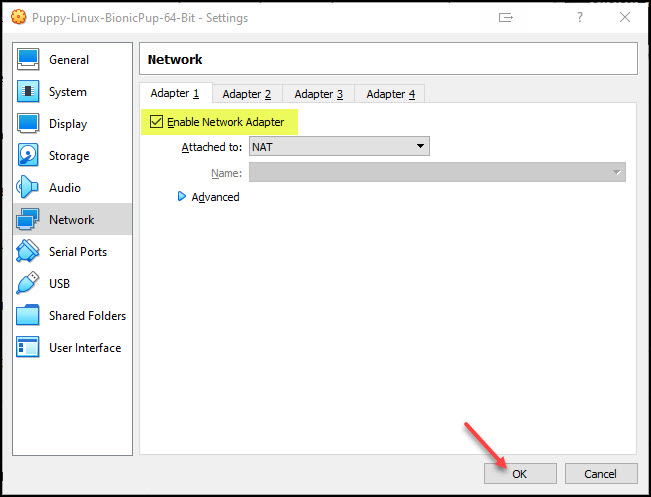
 

bp10.jpg


Network


Finally, ensure your Network Adapter is enabled and attached to NAT (it should be by default) and then click the OK button to exit out of settings


bp11.jpg


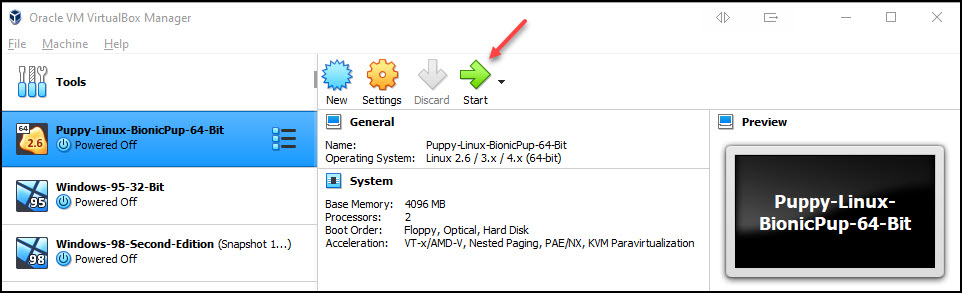
Running BionicPup64 8.0 Linux for the first time


Step 6. Now that you’ve set your VM to optimal defaults, click the Start button to Boot the VM


bp12.jpg


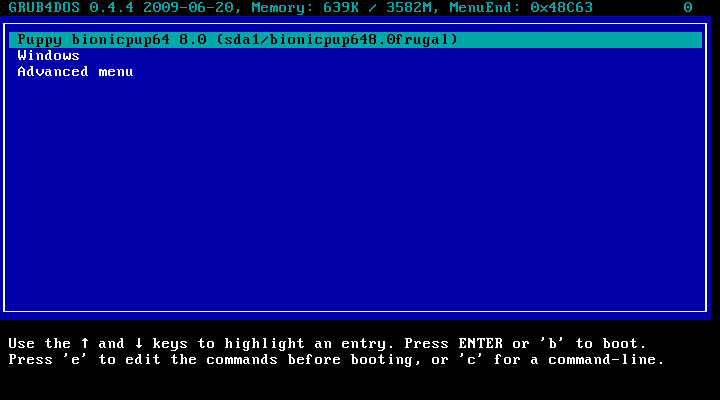
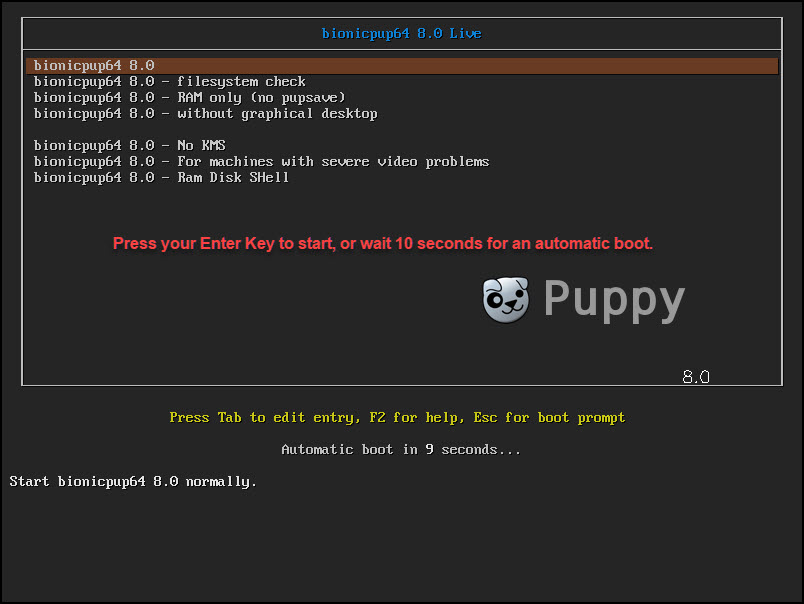
Step 7. The virtual machine boots to the following screen. Either wait 10 seconds for the boot to automatically continue, or press your Enter key

 
bp13.jpg


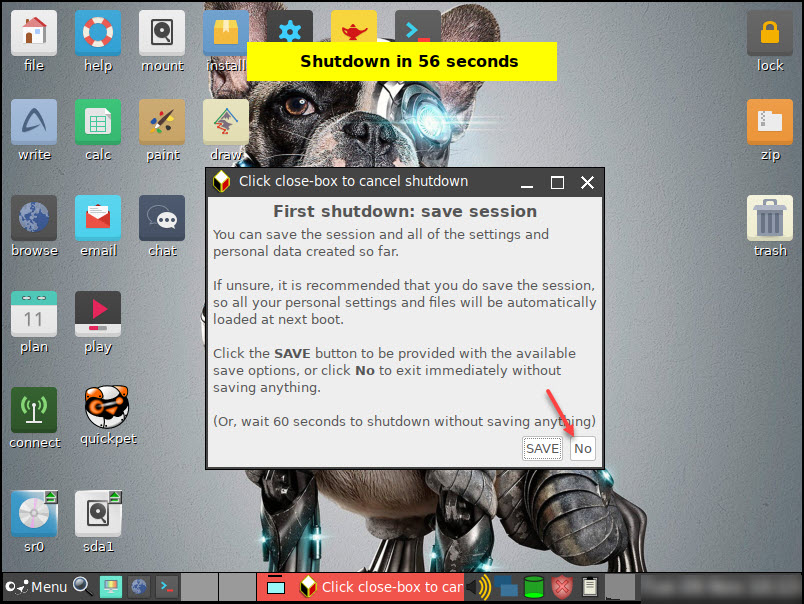
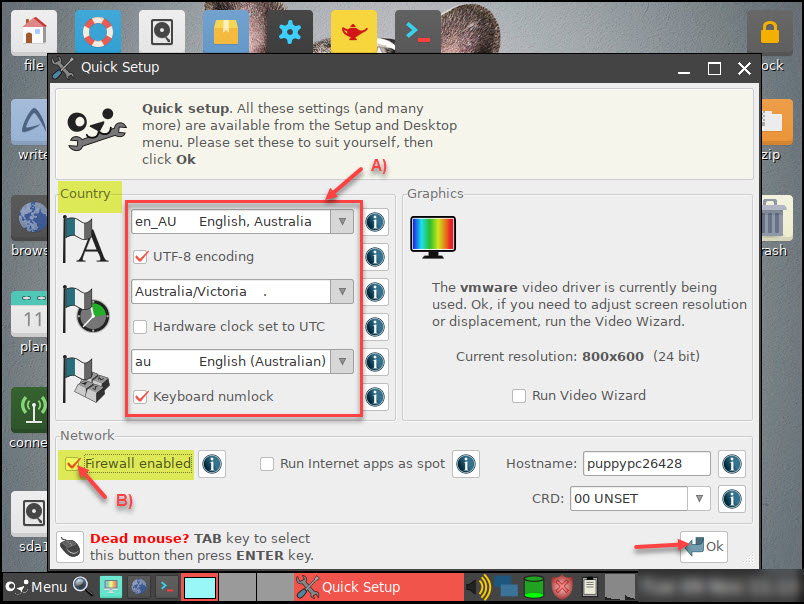
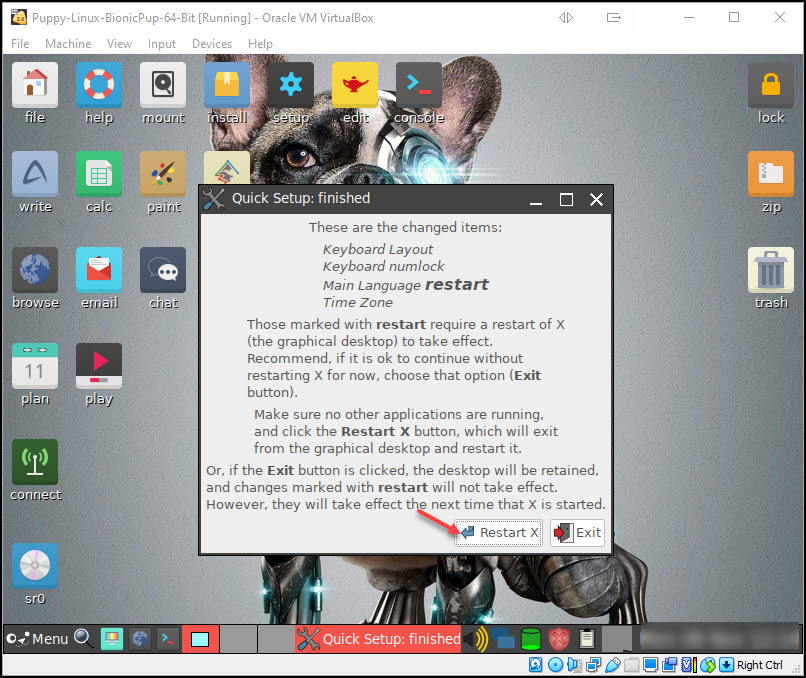
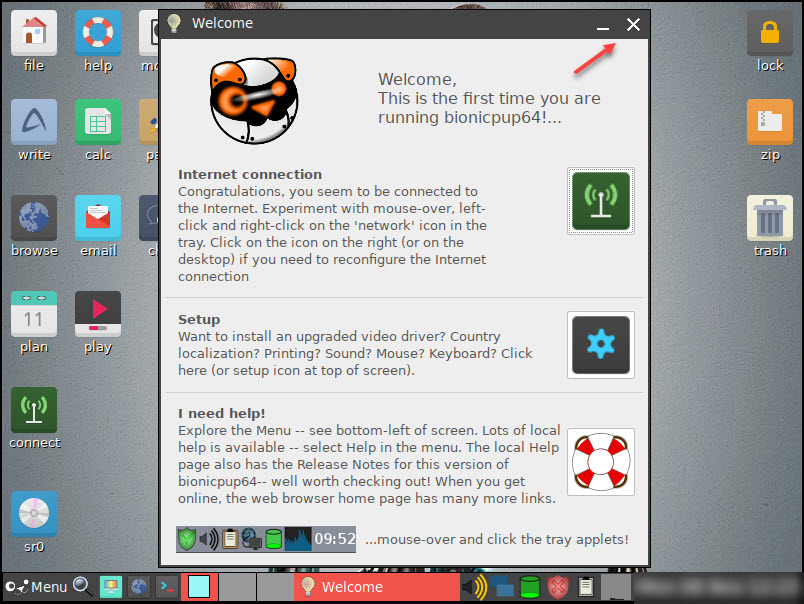
Puppy will boot into the Quick Setup screen as shown below. You can change these to suit yourself if you want to, but as we’re working on Live Boot at the moment, any changes will be lost so just click the OK button to continue. 


bp14a.jpg


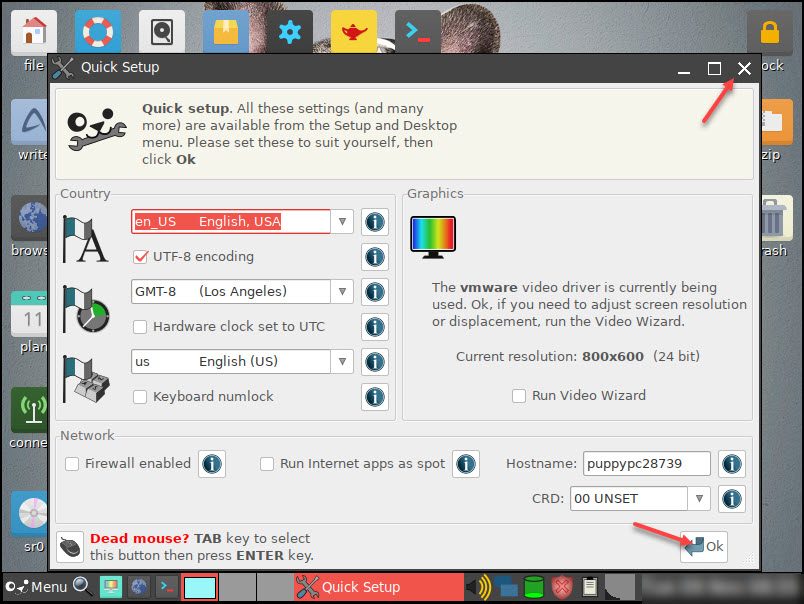
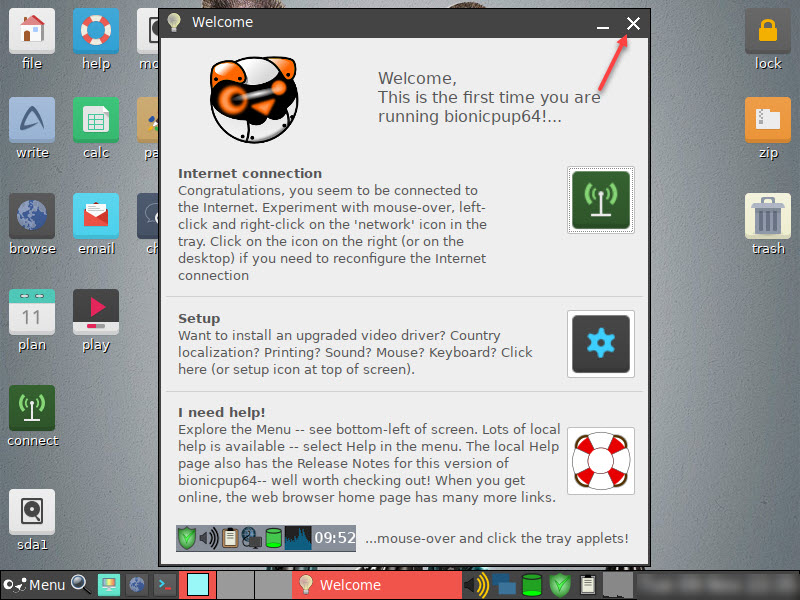
Step 8. Close the Welcome screen and continue to Step 9.


bp16.jpg


Preparing your VDI Partition


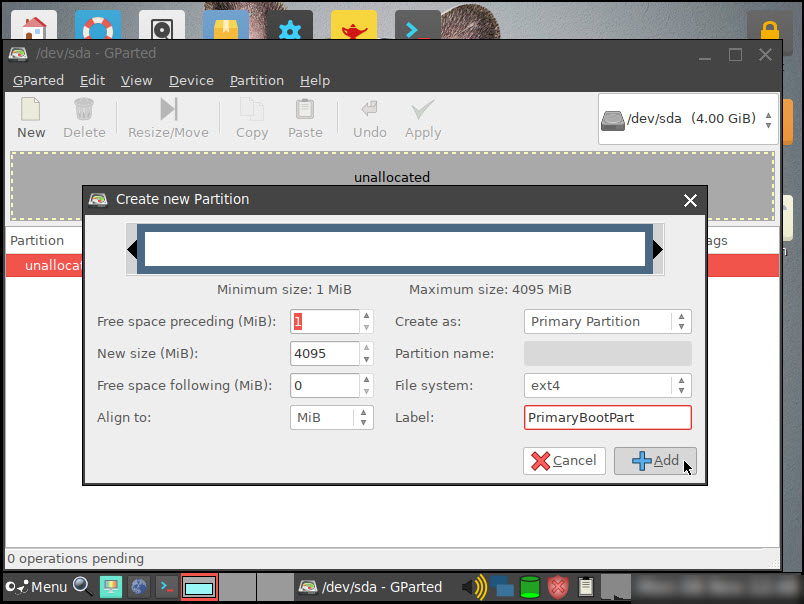
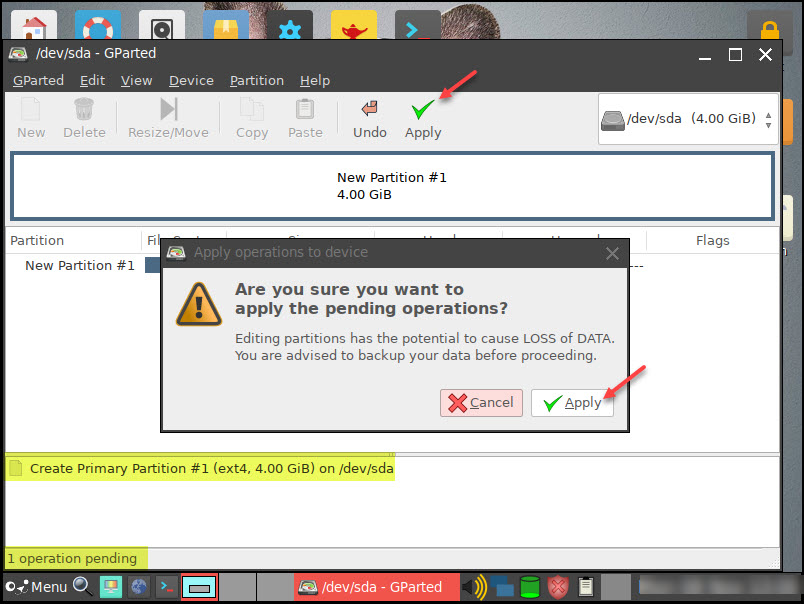
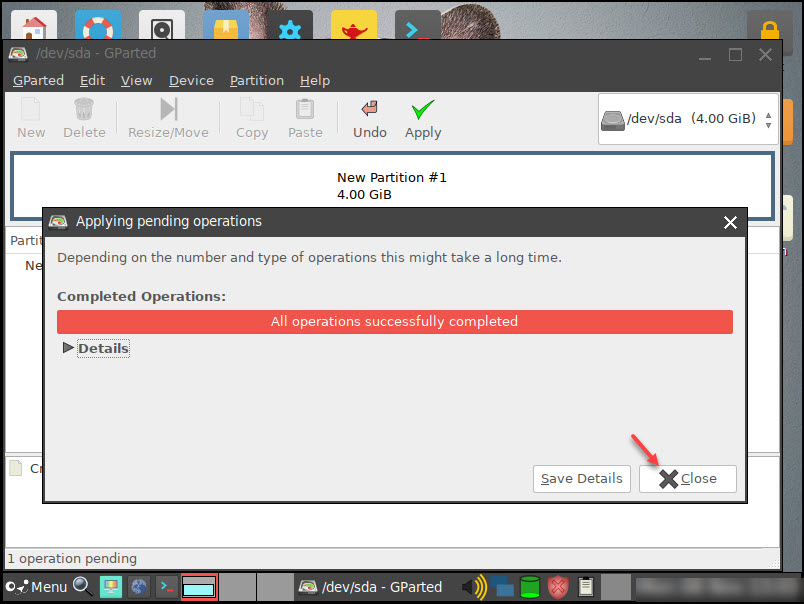
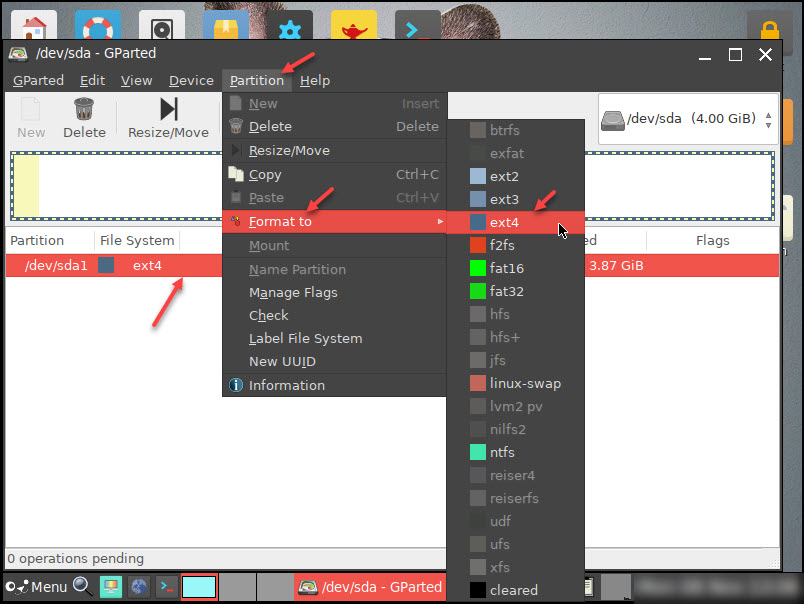
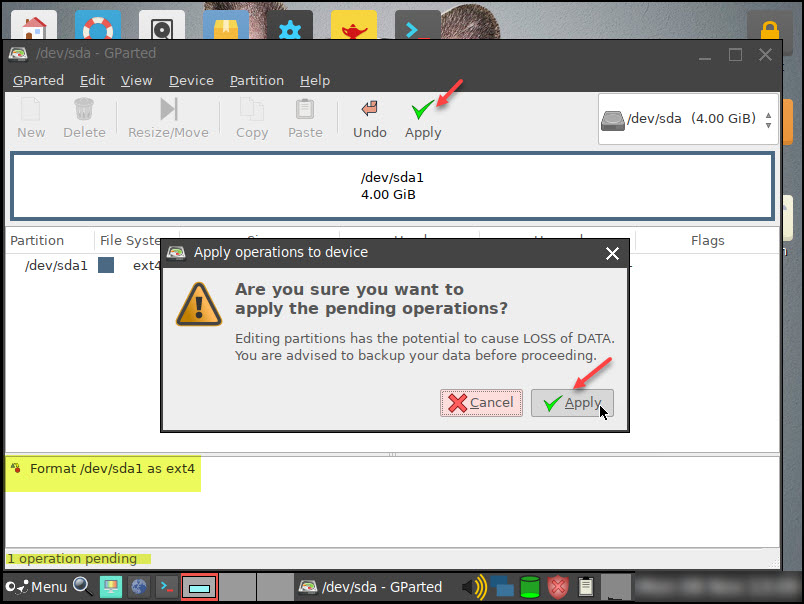
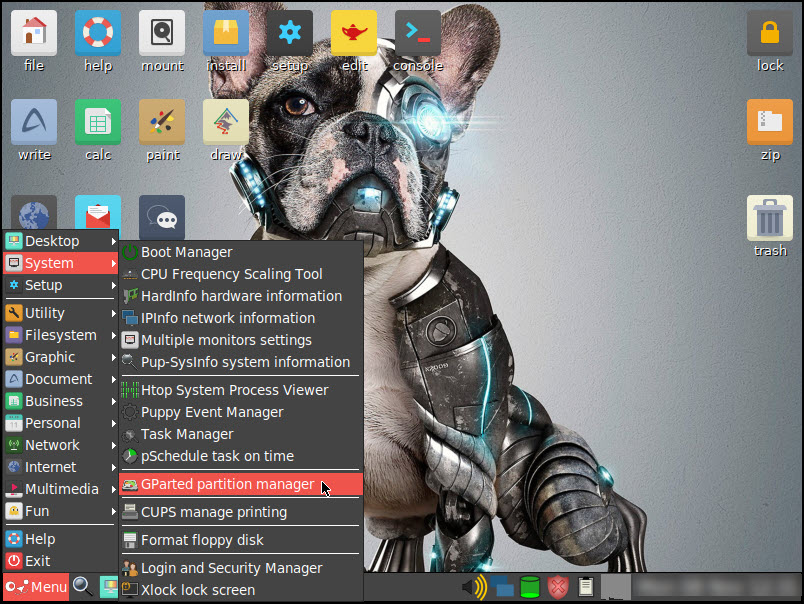
Step 9. Time to prepare the virtual disk image you created earlier for a permanent install of BionicPup64 on it.


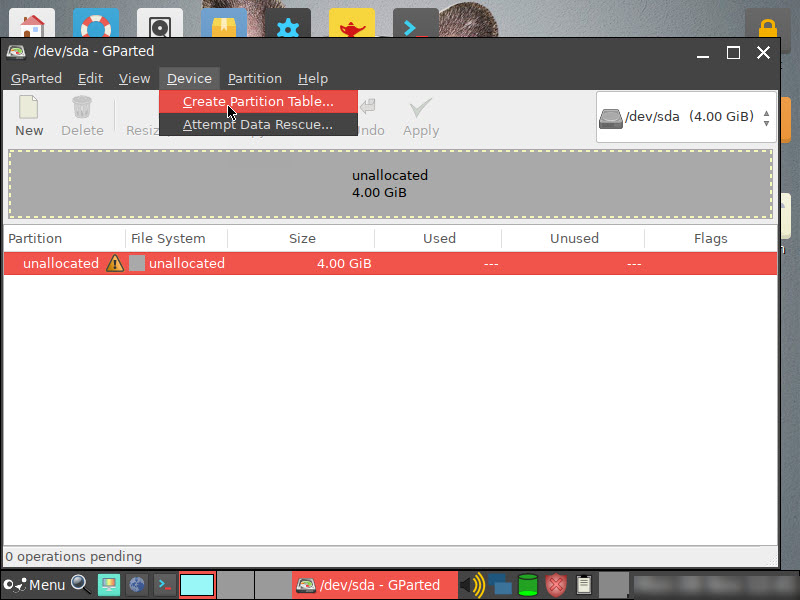
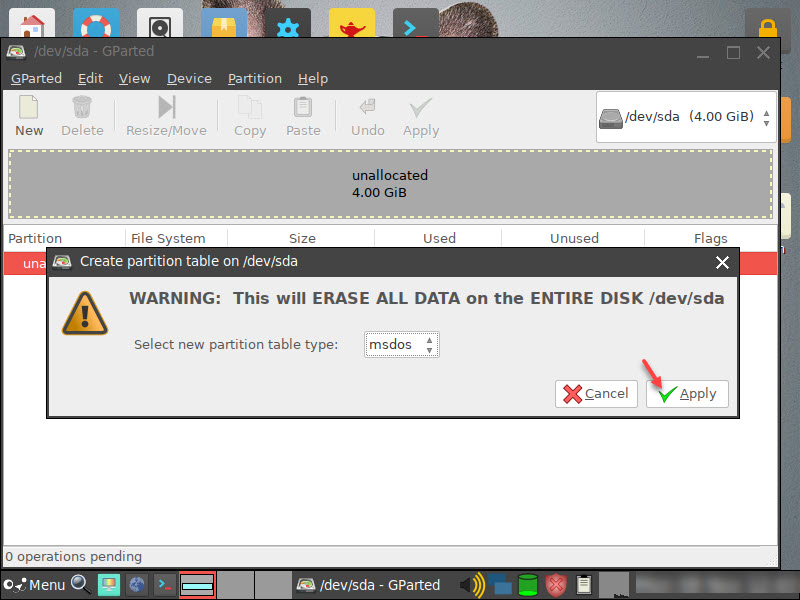
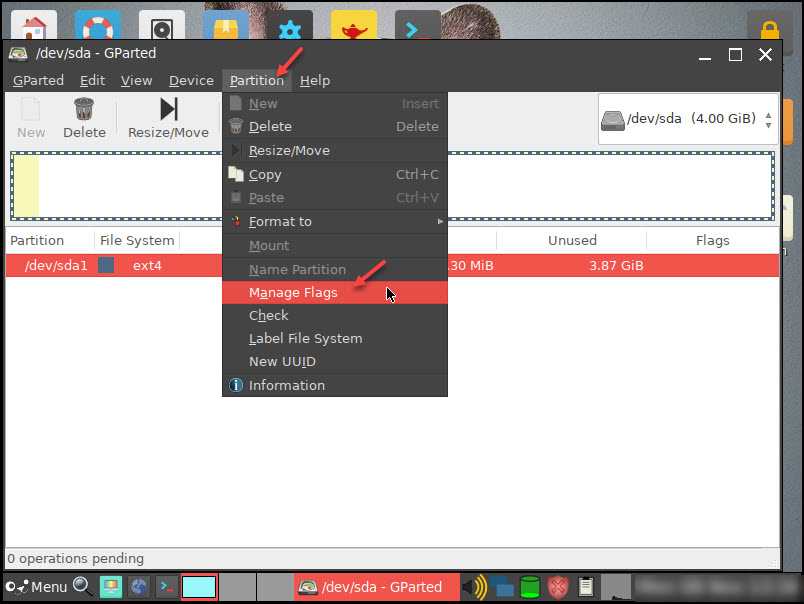
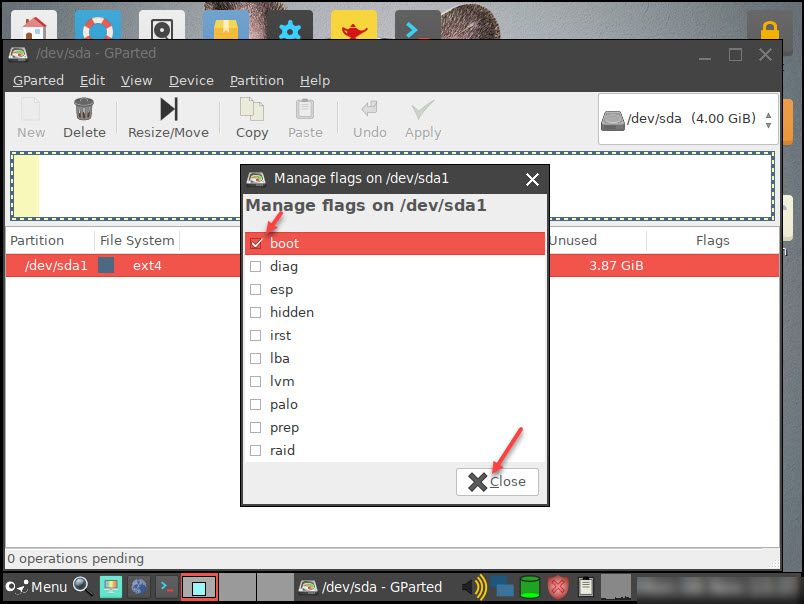
Click Menu > System > GParted partition manager


bp17.jpg


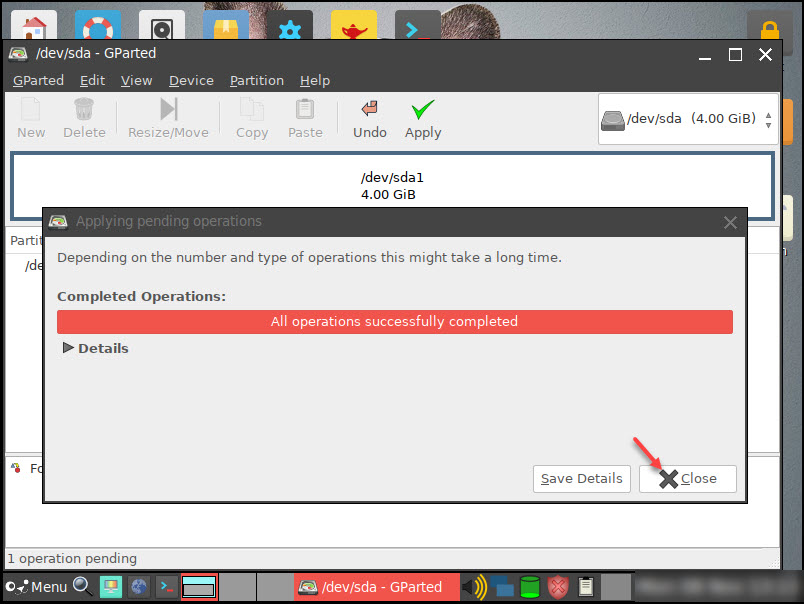
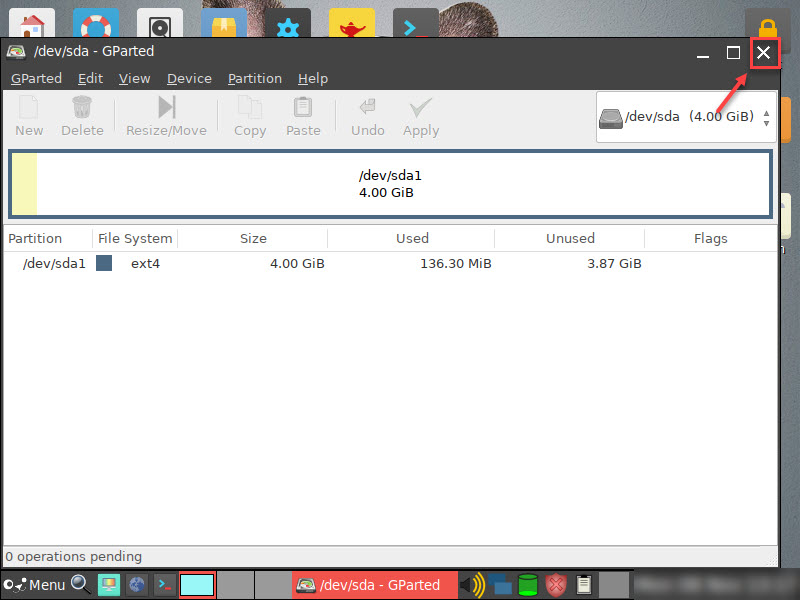
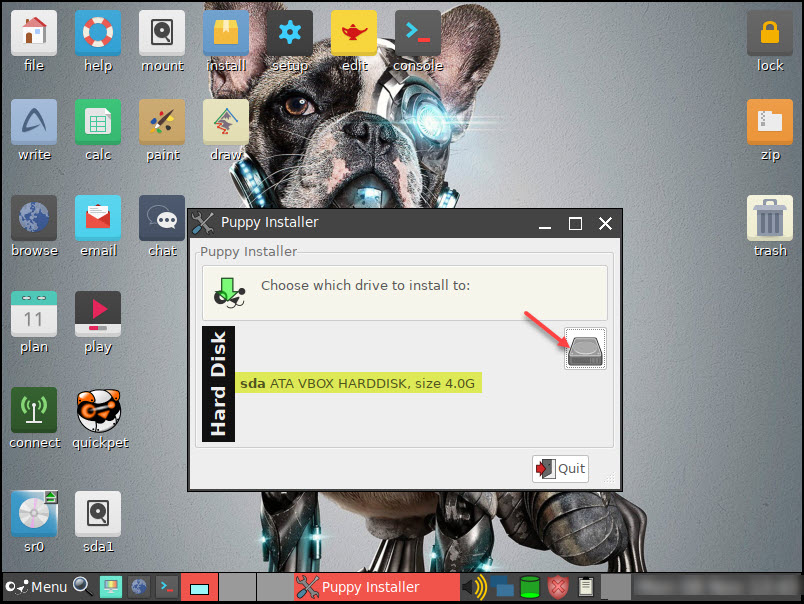
Step 10. Select sda internal drive -- ATA VBOX HARDDISK and click the OK button


bp18.jpg


Continued in next post...


Andrew Leniart - IT Professional / Freelance Journalist


Helping others, to help themselves for 20+ Years


Links to all my Articles & Tutorials can be found at this link (Contains no Ads or Nags)            


Follow Me on:  LinkedIn / Facebook


BC AdBot (Login to Remove)


#2 achzone

achzone
  • Topic Starter

  •  Avatar image
  • Members
  • 3,990 posts
  • OFFLINE
  •  
  • Gender:Male
  • Location:Melbourne, Australia
  • Local time:03:02 PM

Posted 09 November 2021 - 07:27 PM

Step 11. You now need to create a partition on the unallocated VDI space, so select it and then click Device > Create Partition Table

 
bp19.jpg


Step 12. Accept the msdos default for now and just click Apply


bp20.jpg


Step 13. Next click Partition > New from Gparted’s menu bar and set the defaults as shown below and click the Add button.


bp21.jpg


Step14. Click Apply to complete the pending Create Partition operation and then Apply again to confirm you want to proceed


bp22.jpg


Step 15. Click Close to return to the GParted main screen


bp23.jpg


Step 16. Click the partition once to highlight it, then click Partition > Format to > ext4 from the menu bar


bp24.jpg


Step 17. Click Apply to complete the pending Partition Format operation and then Apply again to confirm you want to proceed


bp25.jpg


Step 18. Click Close to return to the GParted main screen


bp26.jpg


Step 19. One last important step here. Select the partition, then click Partition > Manage Flags from the menu bar


bp26-a.jpg


Step 20. Check the “boot” flag and then click Close. This makes the partition bootable


bp26-b.jpg


Step 21. We’re now done here, so close GParted by clicking X at the top right


bp27.jpg


Install Puppy to your permanent VDI


Step 22. Now it’s time to install BionicPup64 to the Virtual Hard Disk Image we’ve just manipulated. Click the Install icon on your desktop, then the Universal Installer button


bp28.jpg


Step 23. Click the Internal IDE/SATA/SCSI hard drive option


bp29.jpg


Step 24. Click your sda ATA VBOX HARDDISK as the drive to install to


bp30.jpg


Step 25. Click the Install Puppy to sda1: button to begin the installation


bp31.jpg


Step 26. Click the OK button to confirm you want to proceed with installing Puppy to partition /dev/sda1 with the ext4 file system on it


bp32.jpg


Step 27. Next you may be prompted whether to do a “Frugal” or “Full” installation. Read about the differences on the window shown and select either. I suggest (and am proceeding) with a “Frugal” installation here. To do that, click the FRUGAL button. 


Note: On some puppy builds, you may not get the choice for a Frugal or Full install. In that case (such as with FossaPup64) the default install will begin as a Frugal installation anyway.


bp33.jpg


Step 28. Click the OK button to continue


bp34.jpg


Step 29. Click the OK button again to continue


bp35.jpg


Step 30. Click the Yes button to confirm you want to install Grub4dos


bp36.jpg


Continued in next post...


Andrew Leniart - IT Professional / Freelance Journalist


Helping others, to help themselves for 20+ Years


Links to all my Articles & Tutorials can be found at this link (Contains no Ads or Nags)            


Follow Me on:  LinkedIn / Facebook


#3 achzone

achzone
  • Topic Starter

  •  Avatar image
  • Members
  • 3,990 posts
  • OFFLINE
  •  
  • Gender:Male
  • Location:Melbourne, Australia
  • Local time:03:02 PM

Posted 09 November 2021 - 07:47 PM

Step 31. Just leave everything set to default on the Grub4DosConfig windows and click the OK button to continue


bp37.jpg


Step 32. Leave defaults again and just click OK to continue


bp38.jpg


Step 33. Click OK again to confirm


bp39.jpg


Step 34. Now click OK once more to Quit the Grub4DosConfig installer


bp40.jpg


Step 35. Click OK, then OK again, and finally, Close the NEWGRUBTEXT document presented


bp41.jpg


Step 36. Bionic Pup is now installed on the VDI. Click Menu > Exit > Shut Down to temporarily close the VM 


bp42.jpg


Step 37. Click No to save this session. Puppy will shut down.


There is no need to save this session because we’ve already configured the partitions on the VDI and installed Puppy to it 

 
bp43-a.jpg


Step 38. Back at the Oracle VM VirtualBox Manager window, click the Settings button on your BionicPup VM


bp44-a.jpg


Step 39. Navigate to Storage and Right-Click the bionicpup64-8.0-uefi.iso file and then click Remove Attachment 


This tells VirtualBox to no longer boot from the ISO and to boot from the VDI you installed Puppy to instead


bp45-a.jpg


Step 40. Click the Remove button to confirm your choice and then click the OK button to close the Settings window


bp46-a.jpg


Step 41. Now click the Start button to fire up and use your BionicPup Virtual Machine again, only this time, from the installation you made in the earlier steps


bp47-a.jpg


Step 42. When puppy boots this time, you’ll see the following screen. Press your Enter key to continue booting


bp48-a.jpg


Step 43. When Quick Setup presents this time, be sure to set your Locale and other preferences. We’ll set up Puppy to remember these settings for future boots later. At a minimum, you should:
 

A ) Set your preferred Country, State, and Keyboard preferences


B ) Check Firewall enabled to configure Firewall protection at the same time


C ) Click OK to continue


bp49-a.jpg


Step 44. Click the Apply button to accept the generic pre-set firewall rules


bp50-a.jpg


Step 45. You will be prompted to perform a soft Puppy restart (Restart X) so that your locale and other settings can take effect 


Click the Restart X button to continue


bp51-a.jpg


Step 46. Close the Welcome window that appears and proceed to do the first shutdown where we will tell Puppy to remember and automatically save whatever is done each time it's booted up


bp52-a.jpg


Continued next post...


Andrew Leniart - IT Professional / Freelance Journalist


Helping others, to help themselves for 20+ Years


Links to all my Articles & Tutorials can be found at this link (Contains no Ads or Nags)            


Follow Me on:  LinkedIn / Facebook


#4 achzone

achzone
  • Topic Starter

  •  Avatar image
  • Members
  • 3,990 posts
  • OFFLINE
  •  
  • Gender:Male
  • Location:Melbourne, Australia
  • Local time:03:02 PM

Posted 09 November 2021 - 07:58 PM

Step 47. We're on the home stretch. Prepare yourself for a wild ride of confirmations!


This step is essential so that you don't lose all of the preference changes you've just made


Initiate another shutdown by clicking Menu > Exit > Shut Down


bp53-a.jpg


Step 48. Click the SAVE button


bp54-a.jpg


Step 49. Click the administrator button


bp55-a.jpg


Step 50. Click the NORMAL (no encryp.) button


bp56-a.jpg


Step 51. Retain the Save in a folder. *RECOMMENDED* option and click the OK button


bp57-a.jpg


Step 52. Click the OK button


bp58-a.jpg


Step 53. Click the YES, SAVE button on the First Shutdown: sanity check


bp59-a.jpg


Step 54. Now click the “Create pupswap.swp“ button to accept the default 64MB swap file size and “finally” get to watch your Virtual Machine shut down for the first time


bp60-a.jpg


Done!


BionicPup 64 8.0 is now fully installed as a Frugal installation just as if it were installed to a physical hard drive.


Each time you fire up your Virtual Machine now, it will save its state and remember anything you’ve installed automatically.


If you have any questions about using or configuring your new Puppy installation, head over to the Puppy Linux Discussion Forum, create a free account for yourself and ask away. Lots of friendly help for beginners is available there.


Enjoy the speed that using Puppy Linux will give you. I hope this walkthrough helped you out and look forward to any comments you may have below.


Regards, Andrew


Andrew Leniart - IT Professional / Freelance Journalist


Helping others, to help themselves for 20+ Years


Links to all my Articles & Tutorials can be found at this link (Contains no Ads or Nags)            


Follow Me on:  LinkedIn / Facebook


#5 NickAu

NickAu

    Bleepin Grumpy Aussie


  •  Avatar image
  • Moderator
  • 26,064 posts
  • OFFLINE
  •  
  • Gender:Male
  • Location:Australia
  • Local time:04:02 PM

Posted 09 November 2021 - 10:15 PM

Great job.


Edited by NickAu, 09 November 2021 - 10:15 PM.

"When God shuts a Window, he opens a Linux." —Linus 8:7


#6 achzone

achzone
  • Topic Starter

  •  Avatar image
  • Members
  • 3,990 posts
  • OFFLINE
  •  
  • Gender:Male
  • Location:Melbourne, Australia
  • Local time:03:02 PM

Posted 09 November 2021 - 10:29 PM

Thanks for your feedback Nick. Much appreciated :)


Best, Andrew


Andrew Leniart - IT Professional / Freelance Journalist


Helping others, to help themselves for 20+ Years


Links to all my Articles & Tutorials can be found at this link (Contains no Ads or Nags)            


Follow Me on:  LinkedIn / Facebook


#7 Mike_Walsh

Mike_Walsh

    Bleepin' "Puppy" fanatic...


  •  Avatar image
  • Moderator
  • 4,720 posts
  • OFFLINE
  •  
  • Gender:Male
  • Location:King's Lynn, UK
  • Local time:05:02 AM

Posted 10 November 2021 - 07:26 AM

Well, I must say.....amazing job, Andy. Well done!


Reading through all this reminded me that I'd forgotten just how much in the way of GUI 'help' tooltips & wizards'n'stuff Puppy actually has. I haven't gone through all these steps for several years; I usually do a "quick'n'dirty" manual install to a sub-directory, followed by tweaking the bootloader by hand. Takes all of around 5 minutes!


After that, it might take me perhaps 90 minutes or so to set-up and completely customize any Puppy to how I want it. Over time, I've "streamlined" the process; I've built several highly personal .pet packages which, upon the single-click for an install will perform multiple customization steps FOR me, automatically. Some of these steps are also 'fixes' for Puppy peculiarities that tend to interfere with the way I like to do things.


Again; excellent job.


Mike.  :wink:


Distros:- Nowt but Puppies.....
My Puppy Packages ~~~ MORE Packages ~~~ ....and STILL more!
HP Pavilion mid-size tower - 590-p0024na; Pentium 'Gold' G5400 dual-core with H/T @ 3.7 GHz; 32 GB DDR4 RAM; Nvidia GeForce GT710 graphics (2 GB GDDR5) with 'passive' cooler; 1 TB Crucial MX500 SSD primary;  3 TB Seagate Barracuda HDD secondary; 1920x1080 HP 22w LED monitor; 7-port powered USB 2.0 hub; Logitech c920 HD 'Pro' webcam


forum-siggy-small.png


#8 achzone

achzone
  • Topic Starter

  •  Avatar image
  • Members
  • 3,990 posts
  • OFFLINE
  •  
  • Gender:Male
  • Location:Melbourne, Australia
  • Local time:03:02 PM

Posted 10 November 2021 - 12:36 PM

Thanks much for your kind words, Mike. All feedback is always encouraged and appreciated.
 
I'm hoping this will encourage staunch Windows users to give Puppy Linux a try. That it does things so differently to the many other Linux builds I've tried, I believe to be one of its biggest strengths. Nowhere near as dependant on Terminal usage, so for Windows users, that's a huge plus.
 
All the best,
 
Andrew

Andrew Leniart - IT Professional / Freelance Journalist


Helping others, to help themselves for 20+ Years


Links to all my Articles & Tutorials can be found at this link (Contains no Ads or Nags)            


Follow Me on:  LinkedIn / Facebook


#9 Mrvus

Mrvus

  •  Avatar image
  • Members
  • 1 posts
  • OFFLINE
  •  

Posted 28 May 2022 - 08:58 AM

Thank you!

:guitar:


1 user(s) are reading this topic

0 members, 1 guests, 0 anonymous users