How to show hidden files in Windows 7
Lawrence Abrams
- February 1, 2009
- Read 3,779,772 times
Windows 7 hides certain files so that they are not able to be seen when you exploring the files on your computer. The files it hides are typically Windows 7 System files that if tampered with could cause problems with the proper operation of the computer. It is possible, though, for a user or piece of software to set make a file hidden by enabling the hidden attribute in a particular file or folder's properties. Due to this it can be beneficial at times to be able to see any hidden files that may be on your computer. This tutorial will explain how to show all hidden files in Windows 7.
To enable the viewing of hidden and protected system files in Windows 7 please follow these steps:
- Close all programs so that you are at your desktop.
- Click on the Start button. This is the small round button (
 ) in the lower left corner of your screen that has a Windows flag on it.
- Click on the Control Panel menu option.
- When the control panel opens you will see a screen similar to Figure 1 below.

Figure 1. Windows 7 Control Panel
- Click on the Appearance and Personalization link.
- You will now be in the Appearance and Personalization control panel as shown in Figure 2 below.
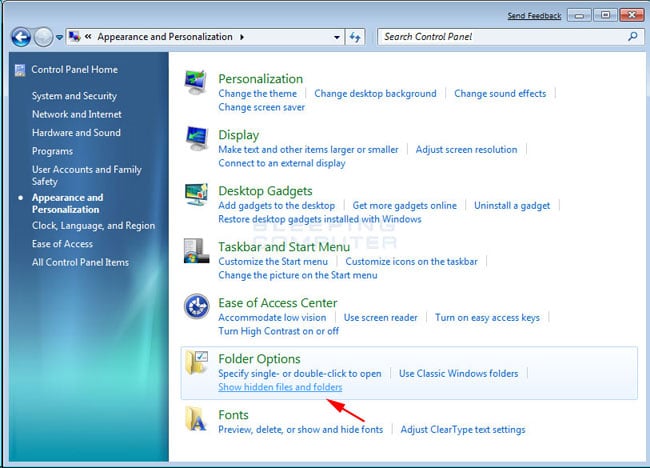
Figure 2. Windows 7 Appearance and Personalization screen
Now click on the Show hidden files and folders option as shown by the red arrow in Figure 2 above.
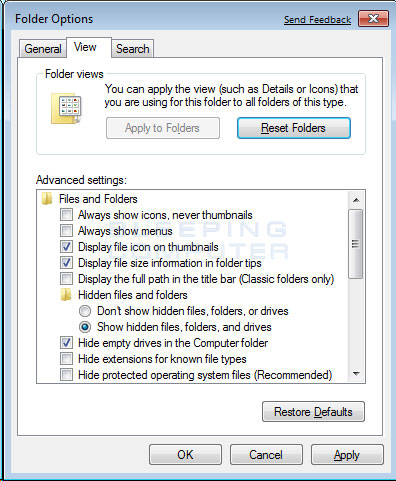
- Under the Hidden files and folders section select the radio button labeled Show hidden files, folders, and drives.
- Remove the checkmark from the checkbox labeled Hide extensions for known file types.
- Remove the checkmark from the checkbox labeled Hide protected operating system files (Recommended).
Once this is done, your Folder Options screen should look similar to the following image.

Figure 3. Folder Options screen
- Press the Apply button and then the OK button.
You will now be at your desktop and Windows 7 will be configured to show all hidden files.
If you have any questions about this tutorial please feel free to post them in our Windows 7 forums.


