Effortlessly protect every device in your home using NordVPN! Setting up NordVPN on a router ensures all your internet traffic travels through the VPN. Learn the benefits and how to set it up..jpg)
Installing a VPN on a router automatically protects every device in your home. This has various advantages. Firstly, it removes the need to install a VPN application onto each of your family's devices. Secondly, it removes the need for family members to remember to connect to the VPN to get online privacy. Third, it allows you to use the VPN on devices that won’t let you install it directly, such as game consoles, IoT devices, smart TVs, set-top boxes, etc.
Setting up NordVPN on a router is easy, but it requires you to have a VPN-compatible router. In this guide, we will explain the entire process, including providing examples of routers that are compatible with NordVPN, and details on how to set up NordVPN on a router.
What routers are compatible with NordVPN?
Before installing NordVPN onto your router, you must first check that your router is compatible. The good news is that NordVPN is compatible with a large number of routers.
It is worth noting that some additional routers may be compatible with NordVPN if you flash your router with VPN-compatible firmware. This will remove the original firmware from your device and install VPN-friendly firmware for you to connect to NordVPN.
NordVPN is compatible with both DD-WRT and Tomato, which are popular open-source firmware variants that support VPNs. If this interests you, you can find lists of routers that are compatible with DD-WRT online.
You can also purchase pre-flashed routers that come ready to connect to NordVPN right out of the box. These pre-flashed routers are available from FlashRouters.com.
Below, we have included a list of routers and firmware types that are compatible with NordVPN according to its website:
- EdgeRouter and Ubiquiti
- GL.iNet
- NetDUMA
- MikroTik
- Peplink/Pepwave
- ASUS WRT
- AsusWRT Merlin
- DD-WRT
- DrayTek Vigor
- OpenWRT
- OPNsense 19.1
- Padavan
- pfSense 2.4.4
- pfSense 2.4.5
- pfSense 2.5
- Sabai
- Tomato
- Privacy Hero
- Roqos
- DrayTek
- EdgeRouter
- TP-Link
How to install NordVPN on a router
NordVPN has guides that explain the entire process for a large number of routers. If you have any problems, you can use Nord’s live chat support to help you through the process.
On some routers and firmware, you might be able to expedite the setup using the FlashRouters Privacy App. Just enter your VPN login information, search for your preferred VPN server location, and click Connect.
If not, we have included a basic outline of all the necessary steps below. If you have a VPN-compatible router by a company like TP-Link, the process will be very similar to the one described below:
1. Login to your router's admin panel.
2. Search for the tab labeled VPN client.
3. In the server list section click Add.
4. Fill in the following details:
- Description: NordVPN (or any name you choose)
- VPN Type: OpenVPN
- Username: Your NordVPN username
- Password: Your NordVPN password
- Encryption parameters as specified by Nord
5. We recommend you additionally enter NordVPN’s DNS nameserver addresses and disable IPv6. This prevents DNS and IPv6 leaks that undermine your privacy.
6. Download the OpenVPN (.ovpn) config file you require from the member’s area of NordVPN’s website. Each server location you wish to connect to will have its own config file.
7. Head back to your router’s admin panel and click Browse next to Configuration file. Locate the .ovpn file you just downloaded to import it into your router’s VPN client.
8. Enter any additional configuration commands as specified by Nord.
9. Save the VPN connection and enable it.
10. With some routers, you may need to select which network devices you want to provide access to the VPN individually. Open the Device list to do this.
Thats it! Once you have followed these steps you can close your router’s admin panel and start using the VPN. Check that the VPN is working to give you an IP address in the desired location and that the connection is free of leaks by using this IP-checking tool. As long as you don’t see your home IP address information in any of the sections (IP, DNS, and WebRTC), then you have successfully set up the VPN.
DD-WRT installation
Setting up NordVPN on a DD-WRT router is a bit more complex:
1. Open your DD-WRT router’s interface and navigate to Setup > Basic Setup.
2. Under Network Address Server Settings (DHCP) enter the following details:
- Static DNS 1: 103.86.96.100
- Static DNS 2: 103.86.99.100
- Static DNS 3: 0.0.0.0 (default)
- Use DNSMasq for DHCP: Check the box
- Use DNSMasq for DNS: Check the box
- DHCP-Authoritative: Check the box
3. Save and Apply these settings.
4. Click the Setup tab in the top right of the DD-WRT interface. Set IPv6 to Disable and Save, and then Apply the settings.
5. Next, navigate to Service > VPN.
6. Under OpenVPN Client, set Start OpenVPN Client to Enable.
7. Navigate to NordVPN’s website and acquire the address and OpenVPN config file (.ovpn) for the server you want to use. Make a note of the address and download the config file to a location you will remember later.
8. Complete the following details in the DD-WRT OpenVPN Client:
- Server IP/Name: Enter the address for the server. It will look like this: uk215.nordvpn.com
- Port: 1194 (or 443 for the TCP protocol)
- Tunnel Device: TUN
- Tunnel Protocol: UDP (or TCP)
- Encryption Cipher: AES-256-CBC
- Hash Algorithm: SHA-512
- User Pass Authentication: Enable
- Username, Password: Your NordVPN service credentials
- First Data Cipher: Not set
- Second Data Cipher: Not set
- Third Data Cipher: Not set
9. Enable Advanced Options and enter the following settings. Any settings not mentioned below you can ignore.
- TLS Cipher: None
- LZO Compression: Disable
- NAT: Enable
10. Copy and paste the following commands into the Additional Config box:
- remote-cert-tls server
- remote-random
- nobind
- tun-mtu 1500
- tun-mtu-extra 32
- mssfix 1450
- persist-key
- persist-tun
- ping-timer-rem
- reneg-sec 0
- log /tmp/vpn.log
- auth-user-pass /tmp/openvpncl/user.conf
11. Find the OpenVPN configuration file you downloaded earlier, and open it with Notepad or some other text editor. Now copy the certificate that appears between <ca> and </ca>. Do not copy the <ca> or </ca> part.
12. Paste the certificate into the CA Cert field of the OpenVPN configuration page in your DD-WRT admin panel.
13. Head back to Notepad and scroll down to <tls-auth>. Copy the TLS Key. Be sure to copy the entire key including the sequences of dashes. You can see the part you need to copy in the image below:
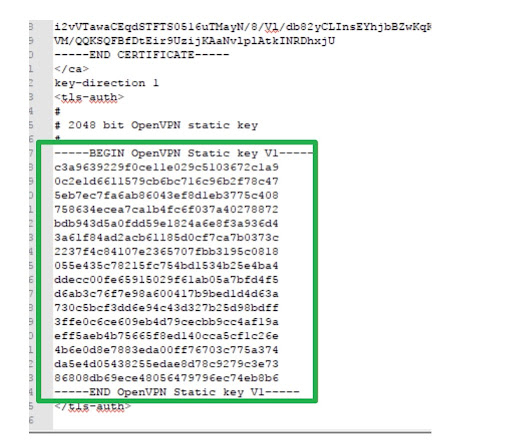
14. Paste the contents into the TLS Auth Key field.
15. Finally, click Save, and then Apply Settings.
Now you are ready to test whether the VPN is working on your devices. You can check that the connection worked in your router by heading to Status > OpenVPN> State (Connected). The devices on your network should now have an IP address in the remote location of the VPN server. You can check this by heading to IPleak.net in your browser.
Why should I install NordVPN on my router?
NordVPN provides the option for people to connect to its servers using a router to give its subscribers added flexibility. When you connect to a VPN using your router, you only use up one of your allocated connections. With NordVPN you are permitted six simultaneous connections, which means that connecting via your router leaves you with five more connections you can use when outside of the home. Every device in your home can use the VPN while only using up one of your six connections.
Connecting to NordVPN on your router also means that you don't need to worry about installing the VPN on every device in your home, and you don’t have to constantly remember to check that you have connected to the VPN. Instead, your privacy will be assured at all times and on every single device that is connected to your WiFi network.
This automatic connection is perfect for protecting IoT devices and smart home appliances, which would otherwise be unprotected. It also means that you get use of a remote IP on devices that won't let you install a VPN directly, such as smart TVs, set-top boxes, and game consoles.
Which routers don’t support NordVPN?
If you are wondering whether your router is compatible with NordVPN, you can check the list below to see routers that aren’t currently compatible when using their native firmware:
- Arris
- Belkin
- Cisco
- D-Link
- Huawei
- Linksys (except WRT32X/WRT32XB AC3200)
- Nighthawk range routers (unless the router is using DumaOS)
- Netgear
- TRENDnet
- Tenda
- TotoLink
- Ubee
- Orbi
- Spectrum
- Xfinity
- Eero
- Verizon
- Starlink
- AT&T
- Most ISP-provided routers not mentioned above
If you have any of the routers listed above you will need to find out whether your model can be flashed with DD-WRT, Tomato, OpenWRT, or Merlin firmware. Changing to one of these firmware will allow you to set up a connection on your router.
What router should I buy for NordVPN?
If you are shopping for a router that is compatible with NordVPN, you can check out the useful service FlashRouters.com. They provide pre-flashed routers that come pre-set to work with a long list of VPN providers, including NordVPN.
If you prefer to buy the router elsewhere, NordVPN recommends options by ASUS above all others, due to their ease of use and compatibility. Below, we have included some viable options:
- Asus RT-AX86U
- RT-AX68U
- RT-AX88U (AX6000)
Alternatively, you can opt for any router that has a built-in OpenVPN client, or that is flashed (or can be flashed) with DD-WRT, OpenWRT, Tomato, and Merlin firmware. Just note that the process of flashing a router yourself can be pretty technical and any mistakes could potentially “brick” the router, leaving it unusable.
Can I use a Netgear router with NordVPN?
The native firmware that comes installed on Netgear routers does not provide an OpenVPN client. You will need to flash the router with an alternate firmware variant if you want to use it as a VPN router. You can check whether your specific model is compatible with DD-WRT firmware by following the link.
Is NordVPN the best VPN for a router?
NordVPN is one of the most trusted and reliable VPNs on the market and it has put a great deal of effort into ensuring that it offers ample router compatibility. NordVPN’s website has router-specific guides for more than a dozen different router variants, which makes it easier to set up than many of its competitors.
Nord exclusively supports OpenVPN connections on routers—no L2TP/IPSec or WireGuard yet.
NordVPN adheres to a no-logging policy, and its diskless servers run exclusively in RAM. It has completed a full third-party audit of its apps, policies, and network infrastructure. All this combined makes NordVPN one of the most trustworthy and secure VPNs available.
It is also worth noting that NordVPN has more than 6,000 servers in 60+ countries, and those servers work to access Netflix, Hulu, HBO Max, YouTube TV, Amazon Prime, BBC iPlayer, and countless other streaming services around the world.
In addition to working on routers, NordVPN has apps for Windows, Mac, iOS, Android, and Firestick, which makes it an excellent all-rounder that you can use on all your devices whether at home, at work, or on public WiFi.
You can find out more in our full NordVPN review.

Did you know
The following information is available to any site you visit:
Your IP Address:
Your Location:
Your Internet Provider:
BLEEPINGCOMPUTER RECOMMENDS:
Using a VPN will hide these details and protect your privacy. We recommend using NordVPN - #1 VPN in our tests. It offers outstanding privacy features and is currently available with three months extra free.
Comments
Shplad - 1 week ago
I can vouch for OpenVPN working quite well on FreshTomato.